Author: Paul@TheBeamDoctor.co.uk

  • Cracks After a Dry Summer: Will the Autumn Rain Close Them?

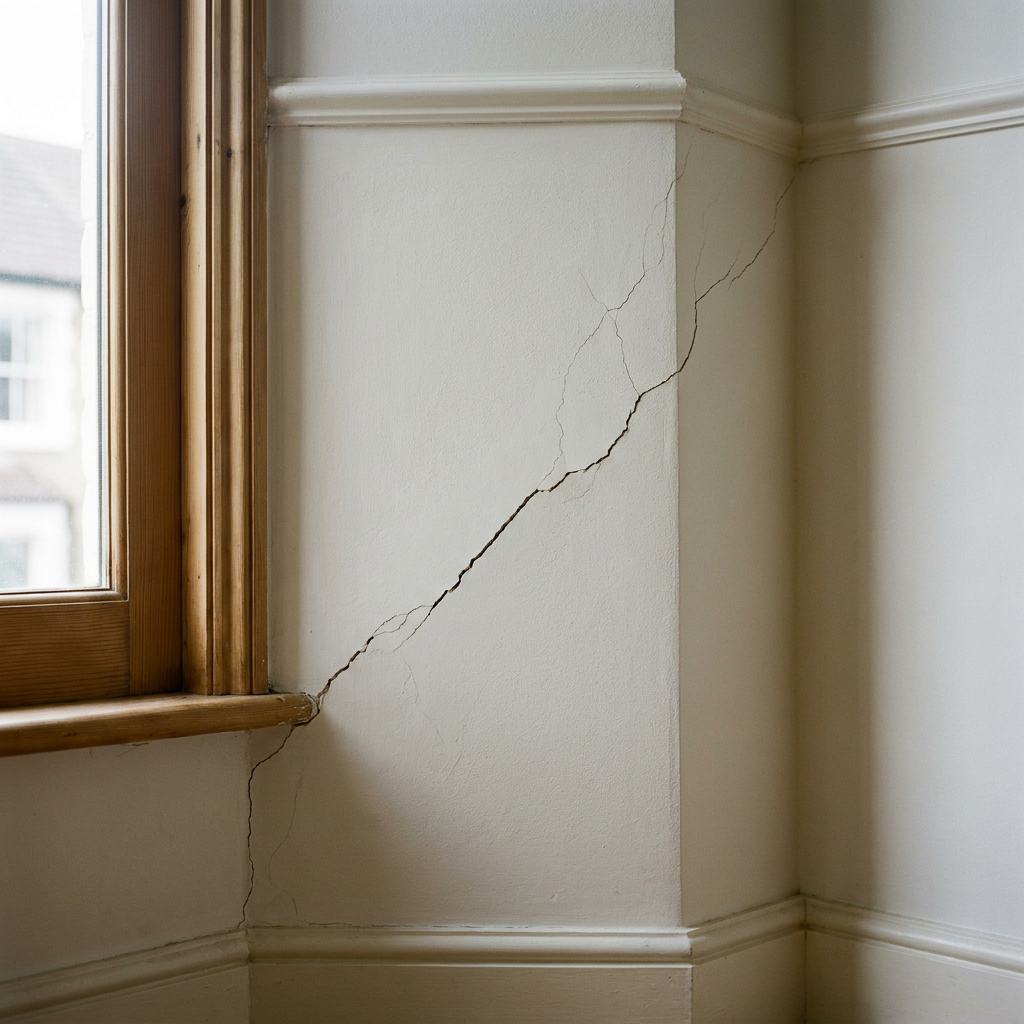
    A dry summer is over, the rain is back, and you have noticed cracks that were not there in spring. You may be hoping they will close up on their own. Sometimes they partly do, but often not quickly, and the worst thing you can do is fill them before anyone has understood what they are doing.

    Key Takeaways

    • Cracks that appear after a dry summer can come from clay soil shrinking under shallow foundations, but that is not the only cause. Around Huddersfield the ground is generally less shrinkable than the clays of south-east England, and clay is one of several suspects.
    • Where clay shrinkage is the cause, autumn rain does not reverse it quickly. The ground can take more than one winter to recover.
    • The most useful question is whether a crack is seasonal (partly closing in winter and reopening in summer), static, or getting steadily worse. One measurement on one day cannot answer it.
    • Do not fill and redecorate yet. Filling removes the evidence of how wide the crack was and whether it has changed.
    • Do not fell a nearby tree without advice. Do check your buildings insurance policy, since most expect you to tell the insurer as soon as you reasonably can about damage that could lead to a claim, and do check gutters and drains near the cracking. Some signs, such as rapid widening or bulging brickwork, need advice straight away rather than monitoring.

    Two Misconceptions Pulling in Opposite Directions

    The first misconception is that a crack appearing in August means the house is falling down. The second is that the first heavy autumn rain will put it right. Both can be wrong, and the second is the more expensive mistake. It persuades people to fill cracks and redecorate before anyone has understood what those cracks are doing, and that removes the evidence that would have guided a sensible decision.

    This post is written from general engineering principles, not from a single case. The mechanisms below are well understood. Which one applies to your house is the part that needs someone to look.

    What Might Be Happening Under Your House

    Some clay soils change volume as their moisture content changes. Through a dry summer the ground dries out, the clay shrinks, and a shallow foundation on it can move down, usually unevenly. That is one form of subsidence: ground movement that the building moves with. It is different from settlement, the initial bedding-down of a new building under its own weight, and from heave, the ground swelling upward as clay takes up water again.

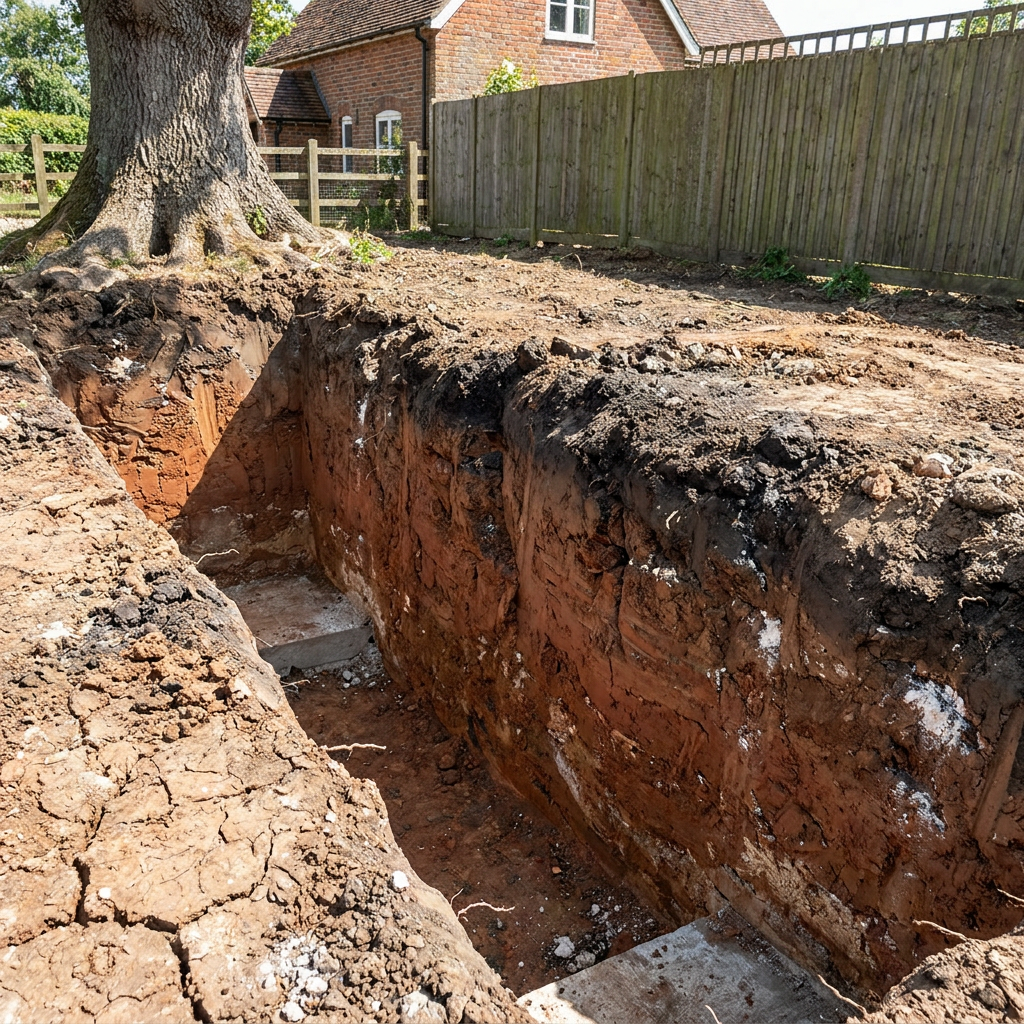
    Trees and large shrubs make it worse. A mature tree in leaf draws a great deal of water from the ground, from a zone that can reach well beyond the edge of its canopy. The species, its mature height, and its distance from the house all matter. NHBC Standards Chapter 4.2, on building near trees, is the guidance used for new foundations on clay near trees, and it is the reason those foundations go deeper than they otherwise would.

    Foundation depth largely decides the outcome. Seasonal drying is greatest in the upper part of the ground, and it reaches deeper near trees. A foundation below the zone that dries out is largely unaffected by a dry summer. A shallow footing, common in older houses, may not be. That is why two neighbouring houses on the same ground can behave quite differently in a hot, dry year.

    Around Huddersfield, Clay Is Only One Suspect

    Much of the advice about summer cracking is written with the highly shrinkable clays of south-east England in mind. The ground around Huddersfield is different. It is mostly mudstones and sandstones of the Coal Measures and the Millstone Grit, in places with a covering of glacial till or of weathered material that has crept down the slopes. Weathered mudstone and till can be clay-rich and can shrink, but usually less than the southern clays. Less is not none.

    So a crack that appeared this summer here could be clay shrinkage, but it could also come from a leaking drain or gutter softening the ground, from made or filled ground (old quarries, mill ponds, and hillside plots levelled with fill are common here), from a slope or retained ground on a hillside plot, from old coal mine workings, or from a problem in the wall itself such as a failed lintel. The timing of a crack is a clue, not an answer. That is why an engineer will usually look at the drains, the slope, and the mining records as well as the trees.

    Not every crack that appears at this time of year comes from the ground. Walls expand in hot weather and contract as it cools, and when the heating goes on in autumn, plaster and timber dry out and shrink. Fine cracks at ceiling and wall junctions, or along plasterboard joints, are often no more than that.

    Why the Rain Does Not Fix It Quickly

    Where clay has dried out over several months, it does not recover in a weekend. Heavy rain after a long dry spell tends to run off hard, dry ground rather than soak in, and the water that does soak in moves down slowly. Recovery is measured in months, and after a very dry year it can take more than one winter.

    In practice, cracks that opened in July or August may still be open, or only a little narrower, by November. On its own that is not evidence that something serious is happening. The question is whether the cracking is seasonal, static, or getting worse, and one observation cannot tell you.

    Seasonal, Static, or Getting Worse

    Cracking caused by seasonal ground movement often partly closes over winter and reopens the following summer. That pattern tells you something that a single crack width does not. It points to a building responding to the seasons: a problem that can become costly if it is ignored for years, but a different kind of problem from movement that keeps going.

    Cracking that widens steadily, never closes between seasons, and comes with doors and windows that increasingly stick or floors that go out of level is telling a different story. That needs earlier professional advice.

    This is why monitoring over at least one full seasonal cycle is so useful. A single reading tells you a crack exists. A series of readings, taken with a proper crack gauge and recorded with the date and the width each time, tells you whether it is seasonal, static, or getting worse.

    Some signs should not wait for a season of monitoring. If a crack is widening quickly, brickwork or stone is bulging or loose, or a door or window has jammed at the same time as new or widening cracks appear around it, get advice straight away. If you think part of the building could fall, keep people clear of it and get a structural engineer out urgently. If it could fall onto a road, a path, or a neighbour’s property, also tell your council’s building control team, which deals with dangerous structures. If a hole or sudden hollow opens in the ground, keep people away from it. If it could be linked to old coal mine workings, or you are not sure, report it to the Mining Remediation Authority (formerly the Coal Authority) at once.

    What I Look At When I Assess Cracking

    When I attend a property to look at cracking, I am not just looking at the width. Several things together build the picture.

    Direction and pattern. Diagonal and stepped cracks through brick or stone, often running from the corners of windows and doors, are what movement in the ground below typically produces, although a failed lintel or thermal movement can produce similar cracks. Openings are the weak points in a wall, so that is where cracks tend to appear.

    Taper. Whether a crack is wider at the top or the bottom helps show which way that part of the wall has moved.

    Distribution. Whether cracking is inside, outside, or both, and whether it all points to one area of movement or is scattered, all help the interpretation.

    Other signs. Doors and windows that stick, floors that are out of level, and gaps opening at skirtings or cornices help confirm whether the cracks match real movement of the structure. Bear in mind that timber doors and windows often stick in damp autumn weather anyway, so a door that has only just started to stick tells you less than one that has got steadily worse.

    BRE Digest 251, Assessment of damage in low-rise buildings, gives the classification engineers use to grade how severe damage is, from damage that is only cosmetic to damage that affects how the building works or its stability. Grading it properly needs measurement and context. A photograph posted online cannot do it.

    Three Things Not to Do, and Two to Check

    • Do not fill and redecorate yet. Fresh filler removes the baseline. If a crack later reopens through new filler, you have lost the record of when it started, how wide it was, and whether it has changed. If you need to fill a crack for weather-tightness, photograph it first with a ruler held against it, and write down the date.
    • Do not fell a mature tree close to the house without advice. A tree that has been drawing water from clay for decades has reached a balance with the ground. Remove it suddenly and the clay can take up water and swell, and that heave can cause more damage than the shrinkage did. Trees covered by a Tree Preservation Order need the council’s consent for most work, and trees in a conservation area need notice to the council before work, so check with the council before any work to the tree. If the tree is not on your land, speak to its owner rather than acting yourself. Removing a tree before anyone has looked also removes evidence an investigation may need.
    • Do not rely on the rain to settle the question. Record the cracks now, with dated photographs and measurements, so there is something to compare against next spring and next summer.
    • Do check your buildings insurance policy. Most policies expect you to tell the insurer as soon as you reasonably can about damage that could lead to a claim, and delay can cause problems later. Check your policy wording for the exact condition, or ask your insurer or broker. Your insurer may appoint its own loss adjuster or engineer, and may monitor the cracks for some months before deciding what to do. If old coal mine workings could be involved, the Mining Remediation Authority has its own subsidence claims process, which is separate from your insurance. You can contact them as well as your insurer.
    • Do check your gutters, downpipes, and drains near the cracking. An overflowing gutter, a downpipe spilling onto the ground, or a blocked gully next to the wall is usually cheap to put right, and water soaking into the ground beside a wall can soften it and let it move. If you suspect a broken drain, a drainage contractor can survey it with a camera. Tell your insurer before any repair, as the survey may form part of a claim.

    When to Get a Structural Engineer

    If cracking is getting wider, runs diagonally through the wall and shows both inside and out, or comes with floors going out of level, gaps opening at junctions, or doors and windows that are getting steadily worse, get it looked at by a chartered structural engineer before you fill it or make any changes. The same applies if there is a large tree close to the house. A fine crack in plaster only, with none of these signs, can usually be recorded and watched. You do not always need a full investigation straight away. Sometimes a visit and a period of monitoring is the right first step. What you need is someone who can tell you which kind of problem you have.


    Need expert eyes on your project?

    I am a Chartered Structural Engineer (CEng, MIStructE) based in Huddersfield. The Beam Doctor offers homeowners and builders:

    • Defect investigation — I attend your property, inspect the cracking or movement, and give you a written opinion on the likely cause, or, where one visit cannot settle it, what monitoring or further investigation is needed. The site visit is included in the price. Monitoring, if it is needed, is priced separately. I take on a limited number of these, and I will confirm whether I can take yours once you have answered a few scoping questions. The report is for your own decisions. I do not take on reports that a lender, valuer, or buyer will rely on. At present I also do not take on reports that an insurer will rely on, or that are to be put to another party, such as a builder or neighbour, to establish what caused the damage. See the fee bands →
    • On-site attendance — a Chartered Engineer at your property, tiered by duration. A brief verbal summary on site, then site visit notes within 2 working days: photographs, annotated sketches, and anything still needed for the design. The notes are a record of the visit, not a report. If you want to know what is causing a crack, Defect Investigation is the right service. See site visit fees →
    • Steel beam (RSJ) calculations — Eurocode-compliant, Building Control-ready, 5 working days from acceptance and receipt of all the information needed. Desk-based, from the information you provide. See all services and current fees →

    Current fees for every service are listed on the services page.
  • Why Your Extension Budget Could Hide a Buried Sewer Problem

    Why Your Extension Budget Could Hide a Buried Sewer Problem

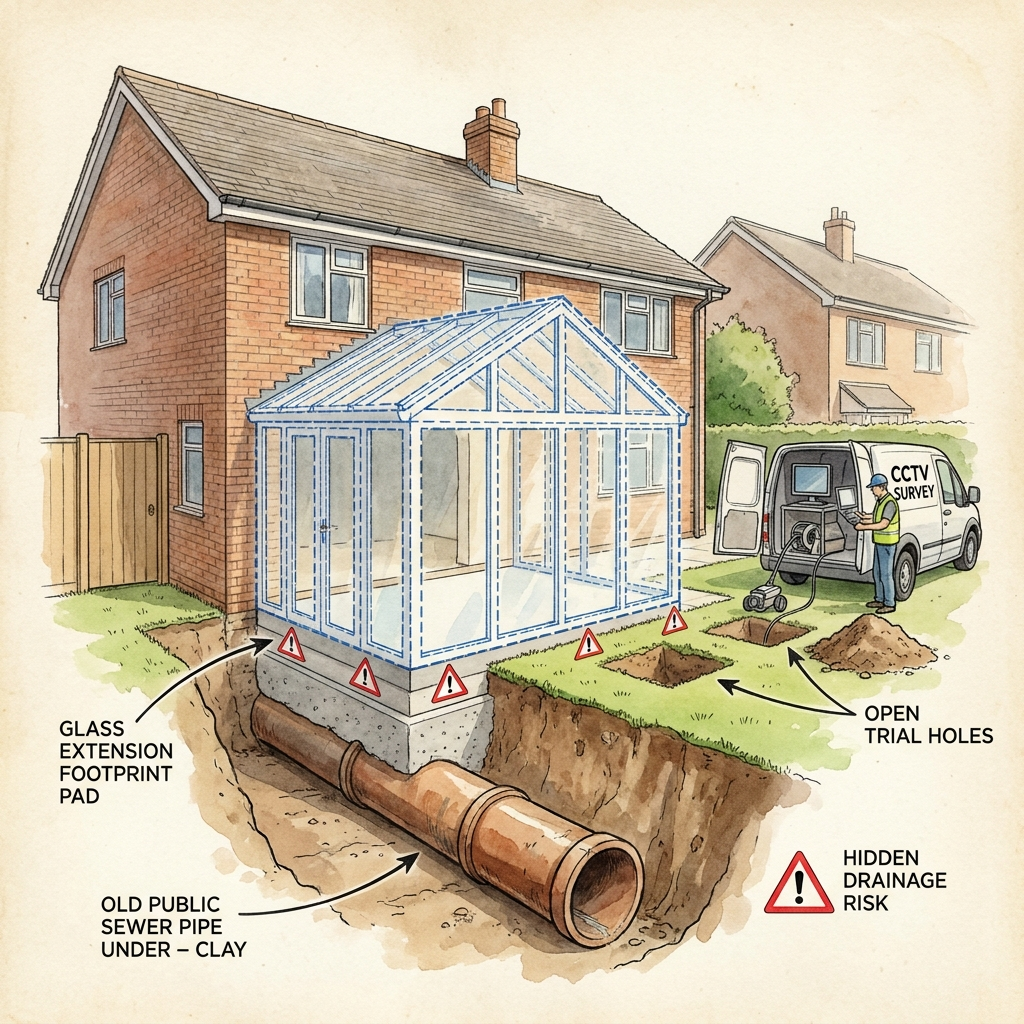
    You’ve sketched the footprint, had a rough quote from your builder, and the project feels real. Then someone mentions a drain — and suddenly the budget you were confident about has a hole in it. Underground drainage is the single most common thing an extension design gets wrong, and the reason is straightforward: you can’t see it.

    Key Takeaways

    • Never fix an extension footprint or finalise a budget before you’ve located all drainage — including public sewers that may cross your plot.
    • Building over or within roughly 3 m of a public sewer requires a formal build-over or build-near agreement with the sewerage undertaker — a process entirely separate from Building Control approval, with its own fees and timeline.
    • Water authority records are useful but not reliable enough on their own; confirm sewer positions physically with a CCTV drainage survey and trial holes before you design.
    • Where a sewer is unavoidably close, foundations must be detailed to keep the pipe outside the structural zone of influence — or to bridge over it so no load is imposed on the pipe at all.
    • The earlier you engage Building Control and the sewerage undertaker, the cheaper the problem is to solve. A sewer found on site redesigns the foundations and rewrites the budget.

    The assumption that costs homeowners money

    I was called in on a suburban extension — a fairly standard single-storey rear addition — where a public sewer sat under, or within a few metres of, the proposed footprint. Nobody had checked. The initial design had been drawn up, a builder was lined up, and the client had a budget in mind. When the sewer came to light, Building Control required a formal build-over agreement with the sewerage undertaker before they’d sign off the foundation design. That agreement meant a separate application, a fee, a survey, and a wait. The project didn’t stop, but it slowed down and cost more than anyone had planned for.

    This is not unusual. It happens regularly on extension projects because underground drainage is invisible and the record information held by water authorities is frequently incomplete or positionally inaccurate. The records are described, quite honestly, as “believed to be correct” — which is not the same as correct. An extension designed around incomplete information is an extension designed around an assumption, and assumptions underground tend to surface at the worst possible moment.

    The lesson from that job is simple: drainage is a design-stage question, not a construction-stage discovery. If you treat it that way, it’s a manageable constraint. If you don’t, it becomes an emergency.

    Locating drainage before you design

    The first step is to obtain the sewerage undertaker’s public sewer records and asset plans for your area. In England, this means contacting the relevant water company — Thames Water, Yorkshire Water, United Utilities, and so on depending on your region — and requesting a sewer map. You should also commission a utility search, which covers gas, electricity, telecoms and water mains as well as drainage. These searches are not expensive and they are essential.

    What they are not is definitive. Sewer records can be out of date, mis-plotted, or simply absent for older infrastructure. A Victorian-era combined sewer may not appear on any digital record at all. This is why the physical verification step matters just as much as the desk research.

    A CCTV drainage survey — where a camera is pushed through the drain from an access point — will confirm the pipe’s condition, diameter, depth, and precise line. Where records are vague or absent, trial holes (carefully excavated pits to expose the pipe) give you the invert level and the exact position. Approved Document H of the Building Regulations and BS EN 752 govern surface water and foul drainage design, and both assume you know where your drainage is before you start detailing around it. That knowledge has to come from physical investigation, not from a map alone.

    Do this work before the architect finalises the footprint. It costs a fraction of a foundation redesign.

    The build-over agreement: what it is and why it matters

    Once you know a public sewer is under or near your proposed extension, you need to understand what “near” means in regulatory terms. As a general rule, building over a public sewer, or constructing within approximately 3 m of one, requires a build-over or build-near agreement with the sewerage undertaker. The exact threshold can vary — the water company will confirm their requirements — but 3 m is the figure most commonly applied in practice.

    Approved Document H4 sets out the principles governing building over or near drains and sewers. It is worth reading, but the agreement itself is not a Building Control process. It is a separate application made directly to the water company, with its own form, its own fee, its own technical requirements, and its own timeline. Building Control will not approve your foundation design without evidence that the build-over agreement is in place or in progress. The two processes run in parallel, and both take time.

    The water company will typically require a CCTV survey of the sewer before and after construction, evidence that the foundation design does not impose load on the pipe, and details of how access to the sewer is maintained for future maintenance. Some sewers cannot be built over at all — particularly larger-diameter or structurally compromised pipes — in which case the extension footprint may need to change.

    None of this is insurmountable. But it cannot be resolved in a week, and it cannot be resolved after the foundations are poured. Identify it at feasibility, engage the water company early, and build the agreement process into your programme and your budget.

    Foundation detailing near a sewer

    When a sewer is unavoidably close to a proposed foundation, the structural challenge is straightforward to state and requires careful detailing to solve. A strip or pad foundation spreads its load into the ground at roughly 45° from the base of the foundation. Any pipe that falls within that cone of influence is at risk of being overloaded, cracked, or displaced as the ground settles under the new load.

    There are three principal remedies, and which one applies depends on the geometry:

    • Keep the foundation clear of the pipe. If the sewer is close but not directly beneath the footprint, repositioning the foundation so the 45° zone does not intersect the pipe is the simplest solution — provided the footprint can accommodate it.
    • Deepen the foundation below the pipe invert. If the foundation is taken down below the level of the pipe, the zone of influence passes beneath it rather than through it. This requires accurate knowledge of the invert depth, which is another reason the CCTV survey and trial holes matter.
    • Bridge over the drain. Where neither of the above is practical, a reinforced concrete lintel or beam can be designed to span over the pipe, transferring the load to bearing points on either side and imposing no load on the drain itself. This is the most engineered solution and requires proper structural design.

    In all cases where a pipe passes through or close to the structure, Approved Document H calls for rocker pipes — short pipe sections with flexible joints — at approximately 150 mm and 750 mm from the face of construction. These accommodate the small differential movements that inevitably occur between a new foundation and the surrounding ground, without cracking the drain. A granular or concrete surround to the pipe provides additional protection against point loads and disturbance during construction.

    These details are not complicated, but they must be designed by someone who understands the load paths. Getting them wrong damages a pipe you cannot see and may not notice until it causes a problem years later.

    Coordination: the thing that actually makes it work

    The thread running through all of this is coordination, and it has to happen early. Three separate parties have an interest in how your extension sits relative to a public sewer: Building Control, who approve the structural and drainage design; the sewerage undertaker, who own the pipe and issue the build-over agreement; and in some cases the local authority, particularly where highway drainage or adopted infrastructure is involved.

    These parties do not automatically talk to each other. It is the designer’s job — and ultimately the homeowner’s responsibility to insist on — making sure all three are engaged before the footprint is fixed and the budget is committed. A pre-application conversation with Building Control costs nothing and can identify the drainage question before it becomes a problem. A call to the water company’s build-over team at the same stage tells you whether an agreement is required and how long it is likely to take.

    The homeowners who get caught out are the ones who treat drainage as someone else’s problem until it becomes everyone’s problem. The ones who don’t get caught out are the ones who ask the question before they start digging.

    When to call a structural engineer

    You need a structural engineer involved as soon as drainage investigation reveals a public sewer within or near your proposed extension footprint. The foundation design around that sewer — whether you’re deepening, repositioning, or bridging — requires structural calculations that Building Control will expect to see, and that the sewerage undertaker’s build-over application will often require as supporting documentation. If you’re at the stage of commissioning a CCTV survey or trial holes and the results show a pipe closer than you’d hoped, that’s the moment to pick up the phone. Trying to resolve the structural detailing without professional input at that point is how small problems become expensive ones.


    Need expert eyes on your project?

    I am Paul, a Chartered Structural Engineer (CEng, MIStructE) based in Huddersfield. The Beam Doctor offers homeowners and builders:

    • Steel beam (RSJ) calculations — Eurocode-compliant, Building Control-ready, 5 working days from acceptance and receipt of all the information needed. See all services and current fees →
    • Defect investigation — I attend your property, inspect the cracking or movement, and give you a written opinion on the likely cause, or, where one visit cannot settle it, what monitoring or further investigation is needed. The site visit is included in the price. Monitoring, if it is needed, is priced separately. I take on a limited number of these, and I will confirm whether I can take yours once you have answered a few scoping questions. The report is for your own decisions. I do not take on reports that a lender, valuer, or buyer will rely on. At present I also do not take on reports that an insurer will rely on, or that are to be put to another party, such as a builder or neighbour, to establish what caused the damage. See the fee bands →
    • Structural Engineer’s Report — a signed desk-based opinion on a single structural concern, for your own decisions about the building. Not for a lender, valuer, buyer, or insurer to rely on. If the question is what is causing cracking or movement, Defect Investigation is the right service. Request a report →
    • On-site attendance — a Chartered Engineer at your property, tiered by duration. See site visit fees →
  • Why Your Garage Door Could Lift Your Roof Off in a Storm

    Why Your Garage Door Could Lift Your Roof Off in a Storm

    You’ve planned every detail of your new garage or workshop — the floor, the electrics, the big roller-shutter door — but there’s one calculation that often gets skipped entirely: what happens to the roof when that door is open and the wind drives straight in. It’s a question I get asked less often than I should, and the answer surprises most people.

    Key Takeaways

    • A large open door pressurises the inside of a building, pushing the roof upward from below — this is the “dominant opening” case, and it must be checked explicitly in any wind assessment.
    • Garage roof wind uplift with the door open can far exceed the uplift on the same building with the door shut — it often governs the design of the roof fixings, the purlins, and the column bases.
    • Light steel-framed, metal-clad buildings have very little self-weight to resist uplift, which makes holding-down at the foundations critical.
    • The door’s position relative to the prevailing wind genuinely changes the numbers — a door on the windward face is the worst case.
    • Before you build a large detached garage, workshop, or car barn with a big door, make sure the wind loading has been designed for the door-open condition. Don’t let it be built like an oversized shed.

    Why “it’s only a garage” is the wrong way to think about it

    I’ve lost count of the number of times a client has prefaced a question with “I know it’s only a garage, but…” — as though the word garage somehow reduces the forces nature applies to a structure. It doesn’t. A large detached garage or workshop, particularly one with a big roller-shutter or up-and-over door, can be subjected to wind loads that would concern any structural engineer, and the door itself is the reason why.

    The job that crystallised this for me was a steel-framed, metal-clad workshop unit — roughly 13 metres by 6.6 metres on plan, with eaves at around 4.8 metres — on a flood-risk plot in the East of England. It had a large roller-shutter door on one face. The brief required a full wind assessment, and when I ran the door-open case alongside the standard closed-building case, the open-door condition governed almost everything: the roof sheet fixings, the purlin and rafter connections, and above all the holding-down at the column bases. The foundation — a raft — had to be sized not just to spread the building’s modest weight across soft, flood-affected ground, but to act as a dead-weight anchor against the roof trying to lift off. That’s a different design problem entirely from “build a slab and sit a frame on it.”

    What actually happens when you open the door

    Wind design isn’t only about pressure pushing on the outside of a building. The pressure inside matters just as much, and a large opening is what changes it dramatically.

    When a building is closed up — windows shut, personnel doors shut — the internal pressure is modest. The Eurocode for wind actions, EN 1991-1-4, gives relatively small internal pressure coefficients for a closed building: roughly +0.2 on the positive side and −0.3 on the negative side. Those values are manageable, and for a typical closed building the roof uplift is real but not usually the thing that keeps an engineer awake.

    Now open a large roller-shutter door on the windward face. Under the Eurocode’s treatment of dominant openings — an opening whose area is at least twice the combined area of openings on the other faces — the internal pressure coefficient jumps sharply. When the large door is roughly twice the area of all other openings combined, the internal pressure coefficient climbs to around 0.75 times the external pressure coefficient at that opening. When it’s three times or more, it reaches around 0.90. That internal over-pressure pushes outward on all surfaces simultaneously: outward on the walls, and — critically — upward on the underside of the roof.

    At the same time, the wind is creating suction on the leeward roof slope in the normal way. Those two effects — internal over-pressure pushing up, external suction pulling up — stack on top of each other. The net uplift on the roof with the door open can be dramatically greater than with it shut. For a light structure with little self-weight, that combined uplift becomes the governing load case.

    Why light steel and metal cladding make this worse

    A heavy masonry building has one significant advantage in a storm: it’s heavy. Dead weight resists uplift. A steel-framed, metal-clad building — the kind typically used for garages, workshops, car barns, and agricultural stores — is deliberately light. That’s part of its appeal: fast to erect, economical, no need for a heavyweight foundation. But lightness is a liability when the wind is trying to lift the roof.

    With very little self-weight to call on, the structural engineer has to design positive anchorage at every level. The roof sheets must be fixed for suction and uplift, not just for someone walking across them during installation. The purlins and rafters must be connected to resist being pulled away from the frame, not just sitting on it. And the column bases must be bolted down to the foundation with holding-down bolts sized to resist a net upward pull — not simply transferring a downward load into the ground as you might assume.

    That last point is the one that surprises builders most. People instinctively think of a column base as something that carries load downward. In the door-open, windward-face case, the column on the windward side can be in net tension — pulling upward on the foundation. If the holding-down bolts and the foundation itself haven’t been designed for that, the building can fail at the base rather than at the roof.

    The position of the door relative to the wind matters

    Not every large door creates the same risk. The dominant-opening effect is worst when the door faces into the prevailing wind — when the wind drives straight through the opening and pressurises the interior most efficiently. A door on a sheltered leeward face, or on a face perpendicular to the prevailing wind, produces a different internal pressure condition and a less severe uplift result.

    In the East of England job, the roller-shutter sat on a face that the wind could drive directly into. That made it the worst-case geometry. In practice, you won’t always be able to choose your door position — the site, the access, and the layout of the building will often dictate it — but it’s worth understanding that the choice has structural consequences. If you’re at the planning stage and have flexibility over which face the large door goes on, that conversation is worth having with your structural engineer before the design is fixed.

    Equally, the size of the door relative to the other openings matters. A modest personnel door on the opposite face, a couple of small windows, and a large roller-shutter on the windward face is a classic dominant-opening geometry. If you add more openings on the other faces — or reduce the size of the main door — the dominant-opening condition may not apply, and the internal pressure remains more benign. Again, this is a calculation, not a rule of thumb.

    What a proper wind assessment covers for a big-door building

    Part A (Structure) of the Building Regulations, supported by Approved Document A, requires that a building is designed to resist all the loads it will realistically experience — and wind is explicitly among them. For any building with a large opening, a proper wind assessment following EN 1991-1-4 must include the dominant-opening case. It is standard chartered practice, not an optional extra.

    In practical terms, that assessment needs to address several things:

    • The door-open case explicitly. The closed-building wind loads are not sufficient on their own. The dominant-opening calculation must be run, and whichever case governs must be used for design.
    • Roof sheet fixings for uplift. The fixing specification — screw type, spacing, pull-out capacity — must be checked against the uplift load, not just the gravity load.
    • Purlin and rafter connections. These must be designed to resist being pulled away from the primary frame under suction.
    • Column base holding-down. Bolt sizes, embedment, and the foundation itself must be checked for net upward load on the tension columns.
    • Foundation dead weight. For a light building, the foundation may need to be heavier than a simple gravity design would suggest — purely to provide the anchorage mass the building needs to stay on the ground.

    In the East of England job, the raft foundation earned its keep twice: once as a way of spreading the building’s modest weight across soft, flood-affected ground, and again as the dead-weight anchor that stopped the roof from lifting. That dual role had to be recognised and designed for from the outset.

    A practical note for self-builders and their builders

    If you’re pricing up a large detached garage, workshop, or car barn, the quote you receive from a steel-frame supplier will almost certainly be based on a closed-building wind assessment — or possibly on no wind assessment at all beyond a generic wind speed lookup. That’s not necessarily negligence; it’s often just the way the market works for smaller structures. But it means the holding-down details, the roof sheet fixing specification, and the column base design may not have been checked for the door-open condition.

    Ask the question directly: has the dominant-opening case been checked? If the answer is uncertain, or if the building has a large door on a windward face and is steel-framed with metal cladding, commission an independent wind assessment before the frame goes up. It is considerably easier — and cheaper — to upsize a holding-down bolt or add fixings to a roof sheet specification at design stage than to retrofit anchorage after a storm has demonstrated the problem.

    And whatever the design says: shut the door in a storm. The dominant-opening condition requires the door to be open. Keeping it shut removes the worst-case internal pressure entirely. That’s not a substitute for correct design, but it is a sensible operational precaution that costs nothing.

    When to call a structural engineer

    If you’re planning any large detached garage, workshop, outbuilding, or car barn with a roller-shutter, up-and-over, or other large door — particularly a steel-framed, metal-clad structure — you should involve a structural engineer before the design is finalised. The same applies if you’re buying an existing building of this type and want to understand whether it was designed correctly. If a supplier or builder cannot confirm that the door-open dominant-opening case has been checked under EN 1991-1-4, and that the roof fixings, rafter connections, and column base holding-down have been designed accordingly, that is the point to seek independent engineering input. A wind assessment and holding-down design for a building of this size is not a large piece of work — but skipping it can have serious consequences when the first significant storm arrives.


    Need expert eyes on your project?

    I am a Chartered Structural Engineer (CEng, MIStructE) based in Huddersfield. The Beam Doctor offers homeowners and builders:

    • Steel beam (RSJ) calculations — Eurocode-compliant, Building Control-ready, 5 working days from acceptance and receipt of all the information needed. See all services and current fees →
    • Defect investigation — I attend your property, inspect the cracking or movement, and give you a written opinion on the likely cause, or, where one visit cannot settle it, what monitoring or further investigation is needed. The site visit is included in the price. Monitoring, if it is needed, is priced separately. I take on a limited number of these, and I will confirm whether I can take yours once you have answered a few scoping questions. The report is for your own decisions. I do not take on reports that a lender, valuer, or buyer will rely on. At present I also do not take on reports that an insurer will rely on, or that are to be put to another party, such as a builder or neighbour, to establish what caused the damage. See the fee bands →
    • Structural Engineer’s Report — a signed desk-based opinion on a single structural concern, for your own decisions about the building. Not for a lender, valuer, buyer, or insurer to rely on. If the question is what is causing cracking or movement, Defect Investigation is the right service. Request a report →
    • On-site attendance — a Chartered Engineer at your property, tiered by duration. See site visit fees →

    Current fees for every service are listed on the services page.

  • How to Know if Your Internal Wall Really Needs a Steel Beam

    You want to open two rooms into one, and someone has already said “you’ll need a steel beam”. Sometimes that is right. Sometimes the wall is carrying nothing, and the steel was never needed. The way to tell the difference is to follow the load down from the roof, and that is a job for an engineer on site, not for a guess.

    This is general guidance on how houses are usually built. It is not advice on your home: I have not seen your property, and every house is different.

    Key Takeaways

    • Whether a wall needs a beam depends on what is sitting on it, and on whether it is bracing another wall. That means looking above the wall: the roof, the loft and, in a house, the floor above.
    • Factory-made trussed rafters usually span between the external walls, so internal walls under them often carry no roof load. “Often” is not “always”.
    • A traditional “cut” roof, with purlins and struts, often does bear on an internal wall. Removing that wall without support can let the roof sag.
    • What you can see in the loft helps you ask the right questions. It does not tell you the wall is safe to remove.
    • Never take out part of a wall to test whether it is load-bearing. A load-bearing wall can fail straight away, or days or weeks later, with no warning.
    • In England, the Building Regulations can apply even when no beam is needed. Check with Building Control before work starts.

    Why the answer starts above the wall

    A house carries its weight from the top down. The roof bears on something. The floors bear on something. Whatever they bear on has to carry that weight down to the foundations. If an internal wall is part of that path, it is load-bearing, and taking it out without a beam lets the structure above it move.

    If nothing bears on the wall and it is not bracing another wall, it may be only a room divider. Even then, it should be confirmed before it comes out, because a wall can be doing a job you cannot see from either side of it.

    So the question is never really “what is this wall made of?”. It is “what is this wall doing?”. The wall itself rarely tells you. The structure around it does.

    Trussed roofs and cut roofs

    Many homes built from the late 1960s onward have trussed rafters. These are factory-made triangulated frames, often with a W-shaped pattern of timbers inside. Each truss normally spans from one external wall to the opposite external wall and is designed to carry the roof without help in the middle. Where that is the case, the internal walls below are not holding up the roof.

    Older homes, and some newer ones, have a cut roof, built from loose timbers on site. The sloping rafters are often supported partway along by horizontal beams called purlins. The purlins are held up by angled or upright struts, and those struts have to bear on something, very often an internal wall. In that case the wall is doing real structural work. Take it out without replacing the support and the purlins can sag and the roof can spread.

    That difference matters. But it is the start of the check, not the end of it.

    Why “it’s a trussed roof” is not the whole answer

    A trussed roof makes a non-load-bearing wall more likely. It does not prove it. These are some of the reasons an engineer keeps looking:

    • The floor above. In a house with an upstairs, the first-floor joists and walls often bear on ground-floor internal walls. The roof type says nothing about that.
    • Trusses designed to use an internal support. Some trusses are designed to rest on an internal wall partway across. And where a heavier “girder” truss (several trusses fixed together, found at hips, the corners of L-shaped roofs, or around openings) lands on a wall, that wall can be carrying a large concentrated load.
    • Trusses that have been altered. Trusses that have been cut or trimmed for storage, a loft hatch or an earlier conversion may now be resting on the walls below, and relying on them. Trussed rafters should never be cut without an engineer’s design.
    • Bracing. An internal wall built into an outside wall can be what holds that wall steady. Take it out and the outside wall can lose its support against bowing, even though it carries no weight from above.
    • Other loads. Water tanks, timbers laid across the ceiling joists, a chimney breast, or a wall higher up can all put weight onto a wall that looks like a simple partition.

    What you can look for in the loft

    If you can get into your loft safely, these are useful things to notice before you speak to an engineer. Stand only on the joists or boarding, never on the ceiling between them. Do not cut, move, or remove any roof timber, including the diagonal bracing, and do not disturb insulation, old boards, or coatings you are unsure about. Photographs of what you see help the conversation.

    • The roof type. Triangulated trusses, or loose rafters with purlins and struts?
    • Anything landing on the wall line. Struts, posts, packing or timbers bearing down on or near the top of the wall you want to remove.
    • Ceiling joists over the wall. In a cut roof, where you can see them without moving insulation, joists that are lapped, joined, or resting on the wall line are often relying on it, even where no strut lands there.
    • Signs of alteration. Cut, trimmed or repaired truss timbers, or extra timbers added later.
    • Weight stored above. Water tanks and their supports, or boarded storage over the wall.

    Treat what you find as questions, not answers. A clear loft is encouraging. It is not permission to remove the wall. The decision needs someone who can see the whole load path, including the parts you cannot see from the hatch.

    Never remove part of a wall to test it

    Do not take out part of a wall to test whether it is load-bearing. If the wall is load-bearing, the structure above can start to move straight away, or it can hold for days or weeks and then drop without warning, onto whoever is working underneath. Cracks are evidence that damage has already happened. No cracks after a trial opening proves nothing.

    Opening up a small area of plaster, ceiling or floorboards so an engineer can see what is inside is different. Do that only where the engineer asks for it, and never remove any of the structure.

    Get the wall assessed before any of it comes out. If it does need support, the removal needs a beam design, and a competent builder must put temporary propping in place first.

    Building Regulations and other permissions

    In England, removing a load-bearing wall is building work under the Building Regulations. It has to go through Building Control before work starts, and Building Control should issue a completion certificate when it is finished. Keep it, because you will need it when you sell. Building Control will normally ask for structural calculations for the beam and its bearings.

    A wall with no structural role can still bring in the Building Regulations. For example, in a house with three or more storeys, including one with a loft conversion, the hallway and stairs are usually the protected escape route in a fire. Opening a room into them can break that, which is covered by Part B (fire safety).

    Any cables or pipes in the wall need dealing with first. Gas pipework should be moved by a Gas Safe registered engineer. Electrical work has to meet Part P of the Building Regulations, and a registered electrician can certify it for you.

    In homes built or refurbished before 2000, textured ceilings, wall panels and some boards can contain asbestos. Have them tested by a qualified asbestos surveyor before the wall or ceiling is disturbed.

    The simplest step is to speak to Building Control before work starts: either your local council’s Building Control team (in Huddersfield, that is Kirklees Council) or a registered building control approver. Tell them what you plan to remove and ask what they need from you.

    Other permissions can apply too. If the new beam will sit on a wall you share with a neighbour, the Party Wall etc. Act 1996 usually means you must serve them notice before the work starts. If your home is listed, taking out an internal wall will usually need listed building consent, and work done without it is a criminal offence. If you are a leaseholder, check your lease before any work.

    What this means for your budget

    Pricing steel before anyone has looked above the wall can go wrong both ways. You can pay for a beam you did not need. Or, worse, a wall that is carrying load can come out without one. Having an engineer look first means the design, and the quote, are based on the building you actually have.

    When to call a structural engineer

    Speak to a structural engineer before you remove any internal wall if you are not sure what it carries. Do it in particular if you have a cut roof with purlins and struts, if there is a floor or a wall above, if the trusses have ever been altered, if you can see cracking near the wall, or if your builder is pricing steel without anyone having checked what the wall supports. Many of these questions can be answered on one site visit. Where the structure is hidden and they cannot, the visit shows what further investigation is needed before anyone relies on the answer.


    Need expert eyes on your project?

    I am a Chartered Structural Engineer (CEng, MIStructE) based in Huddersfield. The Beam Doctor offers homeowners and builders:

    • Steel beam (RSJ) calculations — Eurocode-compliant, Building Control-ready, 5 working days from acceptance and receipt of all the information needed. Desk-based, from the information you provide. If it is not yet clear what the wall carries, that needs a site visit first, which is charged separately. See all services and current fees →
    • Defect investigation — I attend your property, inspect the cracking or movement, and give you a written opinion on the likely cause, or, where one visit cannot settle it, what monitoring or further investigation is needed. The site visit is included in the price. Monitoring, if it is needed, is priced separately. I take on a limited number of these, and I will confirm whether I can take yours once you have answered a few scoping questions. The report is for your own decisions. I do not take on reports that a lender, valuer, or buyer will rely on. At present I also do not take on reports that an insurer will rely on, or that are to be put to another party, such as a builder or neighbour, to establish what caused the damage. See the fee bands →
    • Structural Engineer’s Report — a signed desk-based opinion on a single structural concern, for your own decisions about the building. Not for a lender, valuer, buyer, or insurer to rely on. If the question is what is causing cracking or movement, Defect Investigation is the right service. Request a report →
    • On-site attendance — a Chartered Engineer at your property, tiered by duration. See site visit fees →

    Current fees for every service are listed on the services page.

  • Knocking Through a Load-Bearing Wall: What You Need to Know First

    Knocking Through a Load-Bearing Wall: What You Need to Know First

    You’ve decided to open up your ground floor — maybe knock the kitchen into the dining room, or create that open-plan living space you’ve been planning for years. Before anyone picks up a sledgehammer, there are a few things you genuinely need to understand first, and getting them right will save you time, money, and a very uncomfortable conversation with Building Control.

    Key Takeaways

    • Not every internal wall is load-bearing, but assuming it isn’t can have serious structural consequences — a proper assessment is always worth it.
    • A structural engineer’s beam calculations must come before the builder starts, not after something goes wrong.
    • Building Regulations approval under Part A (Structure) is a legal requirement for this type of work — not optional.
    • Temporary propping during the knock-through is just as important as the permanent steel beam.
    • If the new beam bears into a party wall, or you remove a chimney breast from one, the Party Wall Act will usually apply — even though the wall you are removing is internal.

    Is the Wall Actually Load-Bearing?

    This is the first question every homeowner asks, and it’s a fair one. The honest answer is: you can’t tell just by looking at it, and neither can most builders. There are clues — a wall running at right angles to the floor joists, sitting on a foundation or a beam below, with another wall or roof structure sitting above it — but clues are not conclusions.

    I’ve visited properties where a wall looked like a simple partition but was actually carrying the full weight of a bedroom floor above, plus a section of roof. I’ve also seen walls that looked substantial but turned out to be non-structural stud partitions added during a 1970s refurbishment. The difference between those two scenarios, from a structural point of view, is enormous.

    A proper assessment means looking at the original construction of the house, checking what sits above and below the wall, understanding how the floor joists span, and — where possible — inspecting the loft space to see how the roof loads are distributed. That’s what a structural engineer does. A builder’s “quick look” is not a substitute for that analysis, and if something goes wrong, Building Control will want to know who signed off the structural design.

    What the Wall Might Be Carrying

    Load-bearing walls in a typical UK terraced or semi-detached house can be carrying several things at once. Floor joists from the room above may be bearing directly onto the wall’s head. A wall on the first floor may be sitting directly above the ground-floor wall you want to remove. The roof structure — whether it’s a traditional cut roof or a modern trussed rafter system — may be transferring loads down through the same load path.

    This is why beam calculations are not a box-ticking exercise. When I work out the size of a steel beam (a universal beam section, sometimes still called an RSJ) for a knock-through, I’m calculating the combined load from all of those sources — dead loads from the structure itself, imposed loads from people and furniture, and any roof loads that travel down through the wall. Get the beam size wrong and you end up with a beam that deflects excessively, or worse, one that isn’t safe under full load.

    The beam also needs adequate bearing at each end — usually onto a padstone, which is a block of dense concrete or engineering brick that spreads the point load from the beam end into the supporting wall or pier below. Padstone size is part of the structural calculation, not an afterthought.

    Temporary Propping: The Part People Overlook

    Before any masonry comes out, the structure above needs to be supported. This is done using Acrow props and a system of temporary needles or spreader beams — essentially a temporary load path that keeps the floor and wall above stable while the permanent steel is installed.

    Inadequate propping is one of the most common causes of problems during knock-through work. I’ve seen cases where props were placed too far apart, or where the spreader beam above wasn’t stiff enough to distribute the load properly, leading to cracking in the plasterwork above — or worse, movement in the structure. The propping scheme needs to be thought through properly, ideally by the engineer who has done the beam calculations, so the builder knows exactly where to place the props and how to sequence the work.

    This isn’t about being overly cautious. It’s about making sure the job goes smoothly and the builder isn’t left guessing during a critical phase of the works.

    Building Regulations and Building Control Sign-Off

    Removing a load-bearing wall is notifiable work under Part A (Structure) of the Building Regulations in England. That means you need Building Control involvement — either through your local authority or a private approved inspector. You cannot simply do the work and hope nobody notices. If you come to sell the property, your solicitor will ask for evidence of Building Regulations approval, and if it isn’t there, the sale can stall or fall through entirely.

    The process is straightforward when it’s set up properly. The structural engineer produces calculations and a specification — covering the beam size, padstone details, propping requirements, and any other structural elements. Those documents are submitted to Building Control before work starts. A Building Control officer will inspect the works at key stages, typically when the beam is installed and before it’s boxed in. At the end, you receive a completion certificate, which is the document that confirms the work was done to the required standard.

    Approved Document A provides the technical framework that Building Control uses to assess structural work. Your engineer’s calculations need to demonstrate compliance with that framework, which is why calculations from a chartered structural engineer carry weight with Building Control officers — they know the work has been done properly.

    Party Wall Obligations in Terraces and Semis

    The wall you are removing is usually internal, so it is rarely a party wall itself. The Party Wall etc. Act 1996 comes in because of what the work does to the wall you share with next door. In terraced houses and semis, the new beam often bears into a pocket cut in the party wall, and cutting into a party wall is work the Act covers. Removing a chimney breast from a party wall is another common trigger. New footings for a pier or post close to the neighbouring building can also need notice, even if nothing touches the party wall.

    The Act requires you to serve written notice on the adjoining owners — the owners of the neighbouring property, who may not be the people living there — well before the work begins. The Act sets minimum notice periods, so build them into your programme. The owners can consent or appoint a party wall surveyor. This is separate from Building Regulations — you need both. The party wall process protects the adjoining owners’ interests and, frankly, it protects you too, because a party wall surveyor will normally record the condition of the adjoining property before any work takes place.

    If the adjoining owners consent in writing, the process is quick. If they don’t, a party wall award is drawn up by surveyors, which sets out how the work will be carried out and managed. It adds time and cost, but it’s a legal requirement and not something to skip.

    What Does It Actually Cost?

    I’m often asked about removing a load-bearing wall cost, and the honest answer is that it depends on several variables — the span of the opening, what’s sitting above the wall, whether the beam needs to be a single section or a compound arrangement, and the complexity of the propping required.

    What I can tell you is that the structural engineering fees — beam calculations, padstone design, and Building Control submission documents — are a relatively small part of the overall project cost. The builder’s labour, the steel fabrication, the making-good of plasterwork and floor finishes, and any kitchen or joinery work that follows are typically the larger items. Cutting corners on the structural design to save a few hundred pounds rarely makes sense when the rest of the project budget runs to several thousand.

    Getting the engineering right at the start also avoids the costly scenario of having to re-prop, re-specify, or redo work because Building Control has raised a query that wasn’t addressed in the original design.

    When to Call a Structural Engineer

    Call a structural engineer before your builder starts — ideally before you’ve even had the builder quote, so the scope of work is properly defined. If you’re not sure whether the wall is load-bearing, that’s reason enough to pick up the phone. If you know it is load-bearing and you’re ready to proceed, you need beam calculations and Building Control submission documents before anyone starts propping or cutting. And if the new beam will bear into a party wall, or a chimney breast is coming out of one, factor in the Party Wall Act timeline too. Getting a structural engineer involved early makes the whole project run more smoothly — for you, for your builder, and for Building Control.


    Need expert eyes on your project?

    I am a Chartered Structural Engineer (CEng, MIStructE) based in Huddersfield. The Beam Doctor offers homeowners and builders:

    • Steel beam (RSJ) calculations — Eurocode-compliant, Building Control-ready, 5 working days from acceptance and receipt of all the information needed. See all services and current fees →
    • Defect investigation — I attend your property, inspect the cracking or movement, and give you a written opinion on the likely cause, or, where one visit cannot settle it, what monitoring or further investigation is needed. The site visit is included in the price. Monitoring, if it is needed, is priced separately. I take on a limited number of these, and I will confirm whether I can take yours once you have answered a few scoping questions. The report is for your own decisions. I do not take on reports that a lender, valuer, or buyer will rely on. At present I also do not take on reports that an insurer will rely on, or that are to be put to another party, such as a builder or neighbour, to establish what caused the damage. See the fee bands →
    • Structural Engineer’s Report — a signed desk-based opinion on a single structural concern, for your own decisions about the building. Not for a lender, valuer, buyer, or insurer to rely on. If the question is what is causing cracking or movement, Defect Investigation is the right service. Request a report →
    • On-site attendance — a Chartered Engineer at your property, tiered by duration. See site visit fees →

    Current fees for every service are listed on the services page.

  • Will Your Loft Actually Support a Conversion? What Needs to Happen First

    Will Your Loft Actually Support a Conversion? What Needs to Happen First

    You’ve looked up into your loft, seen the space, and started imagining a bedroom or home office up there. But before you call an architect or a loft conversion company, there’s a question worth asking honestly: is the structure actually ready for that? Understanding the loft conversion structural requirements early saves you from expensive surprises halfway through a build.

    Key Takeaways

    • Your existing ceiling joists were never designed to carry people and furniture — a new structural floor is almost always required.
    • If your roof was built with modern trussed rafters, cutting it open isn’t straightforward — an engineered scheme is needed to redistribute the loads.
    • Steel beams are typically required at eaves level to carry the new floor, and again if you’re adding a dormer.
    • A structural engineer produces the calculations and drawings that your builder and Building Control both need before work starts.
    • Most lofts can be converted — it’s a question of getting the structure properly designed, not of whether it’s possible at all.

    The biggest misconception: your ceiling joists aren’t a floor

    This is the one I find myself explaining on almost every loft conversion enquiry. Homeowners look up at the loft floor — those timbers running across the ceiling of the room below — and assume they’re looking at the floor of the future room. They’re not. Those joists were sized by the original designer to do one job: hold up a plasterboard ceiling. That’s a light, static load. A habitable room is an entirely different proposition — people walking, furniture sitting, wardrobes standing full of clothes.

    Building Regulations require a habitable floor to be designed for an imposed load of 1.5 kN/m² as a minimum for a domestic bedroom. The ceiling joists in most houses, particularly those built from the 1960s onwards, will be nowhere near capable of carrying that. They’re typically 50 × 100 mm or 50 × 125 mm timbers, spaced to suit the ceiling below, not a structural floor above.

    What this means in practice is that a new structural floor almost always has to be formed. That’s not a problem — it’s just something to plan and design for from the outset, rather than discover when a builder starts probing around.

    How the new floor is formed

    The new floor joists are sized properly for their span and the loads they’ll carry. In a standard semi-detached or terraced house, the span from one external wall to the other is often too great for timber alone to handle economically, which is where steel beams come in.

    The typical arrangement is a pair of steel beams — one each side — running along the eaves at the point where the roof slope meets the ceiling. The new floor joists then span between those steels. This keeps the depth of the floor construction reasonable and avoids the new structure eating into the headroom you’re relying on. The steels themselves sit on padstones — bearing plates, usually engineering brick or concrete — that spread the concentrated load from the beam end into the masonry wall below.

    Getting those steels specified correctly matters. Too small and the beam deflects excessively; too large and you’ve wasted money and made installation harder than it needs to be. The calculations that determine the right section size, bearing length, and padstone specification are part of what a structural engineer produces for Building Control.

    The make-or-break roof question: trussed or traditional?

    Once the floor is sorted, the roof itself needs attention — and this is where the type of roof you have becomes critical.

    Houses built from roughly the 1960s onwards are very likely to have a trussed rafter roof. These are the prefabricated timber frames you’ll recognise from the loft — W-shaped or Fink trusses, spaced at 600 mm centres, with diagonal web members running across the space you want to use. The reason those web members are there is structural: each one is doing a job, carrying tension or compression as part of the truss. You cannot simply cut them out to create headroom without causing the roof to fail.

    A trussed roof can absolutely be converted — but it requires an engineered scheme. The loads that the trusses were carrying have to be redistributed through a new structural arrangement, typically involving ridge beams, purlin beams, and new rafters. This is design work that needs to be done by a structural engineer, not improvised on site.

    Older houses — broadly pre-1960s, though there’s overlap — are more likely to have a traditional cut roof: individual rafters, a ridge board, purlins, and struts. These are generally more straightforward to open up because the structural elements are more visible and the load paths more easily modified. That doesn’t mean no engineering is needed, but the starting point is usually less complicated.

    The first thing I do when assessing a loft conversion is establish which type of roof is present. It shapes everything that follows.

    Dormers and the additional structural work they bring

    Many loft conversions include a dormer — a box-like extension through the roof slope that creates extra headroom and floor area. Dormers are popular and often transformative for usable space, but they add structural complexity.

    A dormer requires the existing rafters in that section of roof to be cut. Those rafters were carrying load from the roof covering down to the wall plate. Once you cut them, that load has to go somewhere else. Typically, trimmer rafters and a structural header beam are introduced to frame the dormer opening and carry the loads around it.

    The dormer structure itself — its flat or pitched roof, its cheeks — also needs to be designed. If the dormer is large, a steel frame may be needed to support it. Again, this is calculation work that feeds directly into the Building Control submission.

    What the structural engineer actually produces — and why Building Control needs it

    Part A (Structure) of the Building Regulations requires that any building work — including a loft conversion — doesn’t impair the structural stability of the building. Building Control will want to see evidence that the structural alterations have been properly designed. That evidence comes in the form of structural calculations and drawings from a chartered structural engineer.

    For a loft conversion, that typically means:

    • Floor joist sizing calculations, showing the new timbers are adequate for the imposed and dead loads
    • Steel beam calculations for the eaves beams and any dormer steels, including deflection checks
    • Padstone and bearing calculations
    • A structural scheme drawing showing how the roof alterations work, particularly for a trussed roof

    Your builder needs these drawings to know what to order and how to build. Building Control needs them to sign off the work. Without them, the project stalls — or worse, work proceeds incorrectly and has to be undone.

    One thing I’m clear about with homeowners: the structural engineering is one lane of the loft conversion process, not all of it. Fire safety — a protected stairway, escape windows, fire doors — is a Building Regulations requirement that sits with your architect and Building Control officer, not with me. I focus on making sure the structure is sound and properly documented. The fire strategy is a parallel conversation you need to have with your designer.

    When to call a structural engineer

    You should bring a structural engineer in early — ideally before you’ve committed to a contractor or finalised the design with your architect. The structural feasibility of the conversion, particularly if you have a trussed roof or are planning a large dormer, can influence the design significantly. Getting the engineering assessed at the start means your architect designs around reality, not around assumptions. If you’re at the stage of applying for Building Control approval, you’ll need the structural calculations as part of that submission. Don’t leave it until the builder is on site asking for drawings that don’t exist yet.


    Need expert eyes on your project?

    I am a Chartered Structural Engineer (CEng, MIStructE) based in Huddersfield. The Beam Doctor offers homeowners and builders:

    • Steel beam (RSJ) calculations — Eurocode-compliant, Building Control-ready, 5 working days from acceptance and receipt of all the information needed. See all services and current fees →
    • Defect investigation — I attend your property, inspect the cracking or movement, and give you a written opinion on the likely cause, or, where one visit cannot settle it, what monitoring or further investigation is needed. The site visit is included in the price. Monitoring, if it is needed, is priced separately. I take on a limited number of these, and I will confirm whether I can take yours once you have answered a few scoping questions. The report is for your own decisions. I do not take on reports that a lender, valuer, or buyer will rely on. At present I also do not take on reports that an insurer will rely on, or that are to be put to another party, such as a builder or neighbour, to establish what caused the damage. See the fee bands →
    • Structural Engineer’s Report — a signed desk-based opinion on a single structural concern, for your own decisions about the building. Not for a lender, valuer, buyer, or insurer to rely on. If the question is what is causing cracking or movement, Defect Investigation is the right service. Request a report →
    • On-site attendance — a Chartered Engineer at your property, tiered by duration. See site visit fees →

    Current fees for every service are listed on the services page.

  • Wall Cracks: Subsidence or Settlement? What to Record and When to Call an Engineer

    Wall Cracks: Subsidence or Settlement? What to Record and When to Call an Engineer

    You have spotted a crack in a wall and your stomach has dropped. Take a breath. Many cracks in UK homes come from everyday causes such as plaster drying out, seasonal temperature changes, or movement that stopped long ago. Some do not. This post explains what the different kinds of crack can mean, what you can safely note down yourself, and when it is time to get an engineer to look.

    This is general guidance on how houses usually behave. It is not advice on your home: I have not seen your property, and every house is different.

    Key Takeaways

    • Many cracks are cosmetic, from plaster shrinkage, temperature changes, or old settlement. Some are not, and the width alone does not tell you which.
    • Engineers grade visible damage on the BRE Digest 251 scale, from category 0 (hairline) to category 5 (very severe). The category describes how bad the damage is, not what caused it.
    • A crack that is getting wider, a crack you can see inside and outside at the same place, and doors or windows that have started to stick all need an engineer’s attention. So does any crack you are unsure about.
    • “Subsidence” has several possible causes. Around Huddersfield, the ground is mostly Coal Measures and Millstone Grit rocks, often under clay-rich soils, with old mine workings and made ground in places. Leaking drains and trees matter too.
    • Finding the cause of cracking needs someone at the property. Photographs help an engineer decide how urgent it is and what kind of visit is needed. They do not replace the visit.
    • If you think it could be subsidence, read your buildings insurance policy. Most policies expect you to report it as soon as you reasonably can. Damage from old coal mining has its own claims route.

    Why many cracks are not structural

    Houses move a little all the time, with temperature, moisture, and the loads on them. Plaster is brittle, mortar ages, and timber dries out. All of that can produce cracks that carry no structural meaning.

    The most common is plaster shrinkage. New plaster loses moisture as it dries, and fine cracks can appear within weeks or months, often at joints and corners. Brick, block, and stone walls also expand and shrink with temperature and moisture, so some fine cracks open a little in one season and close in another.

    Older homes often carry cracks from settlement that finished long ago. A new building compresses the ground beneath it, and most of that happens in the first few years. The cracks it left can stay visible for the life of the house.

    The difficulty is that a harmless crack and an early sign of ongoing movement can look alike on the day you find them. That is why the next section is about recording, not deciding.

    What you can safely note down

    Before you speak to anyone, it helps to record what you can see. Write the date on everything.

    • Width. Measure it at its widest point with a crack-width gauge card (inexpensive and widely sold) or a ruler marked in millimetres. Note whether it is wider at the top or the bottom.
    • Length and shape. Is it straight, diagonal, stepped along the mortar joints, or horizontal?
    • Where it is. Near a window or door corner, where two walls meet, near a chimney, or low down near the floor?
    • Inside, outside, or both. Can you see a crack in the same place on the outside of the same wall?
    • What has changed. Doors or windows that have started to stick, gaps opening at skirting boards, or floors that feel out of level.
    • Photographs. Take them square on, with the gauge or ruler held against the crack so the width can be read, and repeat them from the same spot every few weeks.

    Please do not fill or decorate over a crack you are unsure about. Filling it hides the evidence of whether it is still moving, and that is the thing an engineer most needs to know.

    Marking the two ends of a crack lightly in pencil, with the date, is a simple way to see whether it grows longer, and it does no harm. Treat it as a note for yourself, not a measurement: insurers and engineers will not rely on readings a homeowner has taken. Proper monitoring uses fixed gauges, installed and read by the engineer.

    Reading the pattern

    The shape and position of a crack are clues, not answers. As a general guide:

    • Fine cracks in plaster only, at ceiling junctions or board joints, are often shrinkage.
    • Diagonal cracks from the corners of windows and doors are common. They can come from small movements around the lintel, or from something more significant pulling that part of the wall.
    • Stepped cracks along the mortar joints show that one part of the wall has moved relative to another. The question is why, and whether it has stopped.
    • Cracks wider at one end than the other can mean part of the wall is rotating, which is one of the more telling signs.
    • Horizontal cracks in a brick or stone wall can point to rusting wall ties in a cavity wall, a wall bowing outward, or pressure from ground behind the wall, such as a cellar wall or a house built into a slope. Cracks from rusting ties often repeat every few courses up the wall. They deserve an engineer’s attention.
    • A crack you can see inside and outside at the same place suggests the movement has gone right through the wall, not just the plaster or the outer skin. That is a more significant finding.

    The BRE Digest 251 damage categories

    BRE Digest 251 gives engineers and surveyors a common language for how bad visible damage is. It grades damage from category 0 to category 5. The categories are based mainly on how easy the damage is to repair; the typical crack widths are a guide only.

    • Category 0: hairline cracks, less than about 0.1 mm. Negligible.
    • Category 1: fine cracks up to about 1 mm, easily treated during normal decoration. Very slight.
    • Category 2: cracks up to about 5 mm, easily filled; some repointing may be needed outside. Doors and windows may stick slightly. Slight.
    • Category 3: cracks of about 5 to 15 mm, or several cracks over 3 mm. Cracks may need cutting out and patching, and some brickwork replacing; doors and windows sticking. Moderate.
    • Category 4: cracks of about 15 to 25 mm, though the number of cracks matters too. Extensive repair, possibly rebuilding parts of walls; floors sloping, walls leaning or bulging. Severe.
    • Category 5: cracks usually over 25 mm. Major repair or partial rebuilding; risk of instability. Very severe.

    Two things to keep in mind. First, the category describes the damage today, not the cause and not whether it is still moving. A 2 mm crack that is getting wider can matter more than a 6 mm crack that has not changed in years. Second, a wide crack that seems to have stopped still needs an engineer to look: it may have weakened the wall, or the movement may only have paused.

    What can cause subsidence around here

    Subsidence means the ground under the foundations has moved down, taking part of the building with it. The causes depend on the ground and what is happening in it.

    Much of the national advice about subsidence is about shrinkable clay, as found across much of south-east England. Around Huddersfield and the rest of Kirklees, the rock is mostly mudstones, siltstones, and sandstones of the Coal Measures and Millstone Grit. In many places it is covered by clay-rich soil: weathered rock, material that has crept down slopes, glacial deposits in some areas, and river deposits in the valley bottoms. This ground is generally less prone to seasonal shrinking and swelling than the clays of south-east England, though it can still happen, especially near large trees. Other local causes matter more often:

    • Leaking drains, which can soften or wash away the ground under a foundation. They are a common cause of cracking near bathrooms, kitchens, and downpipes.
    • Old mine workings, which are found in parts of the district. A coal mining report, from the Mining Remediation Authority (the name the Coal Authority now operates under), can show whether a property is in an area affected by past coal mining.
    • Made ground, meaning filled or tipped ground, which can keep settling long after it was placed.
    • Trees on clay soils, especially large ones close to the house, where the ground can shrink as they draw water from it.
    • Slopes, where ground can creep slowly downhill.

    None of these is diagnosed from a photograph. Working out which, if any, applies means looking at the building, the ground around it, and often the drains.

    Your insurer and your engineer

    If you think your cracking could be subsidence, read your buildings insurance policy. Most policies expect you to tell the insurer as soon as you reasonably can about damage that could lead to a claim, and delay can cause problems later. Check your policy wording for the exact condition. Your insurer may appoint its own engineer or loss adjuster, and may monitor the cracks for some months before deciding what to do.

    If old coal mine workings could be involved, the Mining Remediation Authority has its own subsidence claims process, which is separate from your insurance. You can contact them as well as your insurer.

    You can still get your own independent engineer’s opinion. Your insurer may not pay for an engineer you appoint yourself, so check with them first if cost matters. If a claim is open or likely, tell the engineer before you instruct them. It affects what their report is for and who can rely on it, and some engineers, including me at present, do not take on crack or movement investigations that an insurer will rely on.

    When to call a structural engineer

    Speak to a chartered structural engineer if a crack is getting wider or longer, if it is wider at one end than the other, if a crack is wide, even if it seems to have stopped, if you can see it inside and outside at the same place, if doors or windows have started to stick, if you see horizontal cracking or bulging in a brick or stone wall, if cracks appear near a drain, a large tree, or a slope, or if you are simply unsure what you are looking at.

    If you are buying a house with visible cracking, raise it with your surveyor before you commit; they may recommend a structural engineer. If your insurer has raised subsidence, you can still get an engineer’s opinion for your own decisions, as explained above.

    Photographs and your notes help the engineer judge how urgent it is and what kind of visit is needed. Finding the cause needs someone at the property. Sometimes one visit is enough to give a clear opinion. Sometimes the honest answer after one visit is that the cracks need monitoring over several months before anyone can say whether they are still moving.

    When it cannot wait

    Some signs need action the same day: a crack opening quickly, a wall that has started to bulge or lean, or a bulge that is getting worse, a ceiling sagging, a chimney that has started to lean, a door or window that has suddenly jammed, or cracking or sagging after a wall has been taken out or building work has started. Keep people away, stop any building work, and do not try to prop or repair it yourself. Get a structural engineer to look as soon as you can, and if a builder is working on the house, ask them to arrange temporary support through their engineer straight away. If anything could fall onto a road or path, contact your council’s Building Control dangerous structures service. If collapse looks imminent or anyone is hurt, call 999. If you smell gas, leave the building and call the National Gas Emergency Service on 0800 111 999. If the ground suddenly opens up or sinks near your home, keep away. In a coalfield area, report it to the Mining Remediation Authority; if it is in a road or pavement, tell the council as well.


    Need expert eyes on your project?

    I am a Chartered Structural Engineer (CEng, MIStructE) based in Huddersfield. The Beam Doctor offers homeowners and builders:

    • Defect investigation — I attend your property, inspect the cracking or movement, and give you a written opinion on the likely cause, or, where one visit cannot settle it, what monitoring or further investigation is needed. The site visit is included in the price. Monitoring, if it is needed, is priced separately. I take on a limited number of these, and I will confirm whether I can take yours once you have answered a few scoping questions. The report is for your own decisions. I do not take on reports that a lender, valuer, or buyer will rely on. At present I also do not take on reports that an insurer will rely on, or that are to be put to another party, such as a builder or neighbour, to establish what caused the damage. See the fee bands →
    • On-site attendance — a Chartered Engineer at your property, tiered by duration. A brief verbal summary on site, then site visit notes within 2 working days: photographs, annotated sketches, and anything still needed for the design. The notes are a record of the visit, not a report. If you want to know what is causing a crack, Defect Investigation is the right service. See site visit fees →
    • Steel beam (RSJ) calculations — Eurocode-compliant, Building Control-ready, 5 working days from acceptance and receipt of all the information needed. Desk-based, from the information you provide. See all services and current fees →

    Current fees for every service are listed on the services page.

  • Soakaways on Clay: Test the Ground Before You Build

    Soakaways on Clay: Test the Ground Before You Build

    If your project needs a soakaway, for a new roof, an extension, or a conversion off mains drainage, the ground decides whether it will work. On clay and other slow-draining ground, a soakaway built without a test can fail in its first wet season. The test that tells you in advance is a small cost next to digging it up again.

    Key Takeaways

    • A soakaway is a designed structure, not a hole filled with rubble. It has to be sized from how fast your ground actually takes water away, measured on site.
    • There are two different tests, for two different jobs. A surface water soakaway is usually tested and sized to BRE Digest 365. A drainage field for effluent from a septic tank or treatment plant uses the percolation test in Approved Document H. They are not interchangeable.
    • On clay and other low-permeability ground, the test often shows a soakaway will not work at a practical size. The answer then is a different route, such as discharge to a watercourse or a sewer, often with storage and a controlled outflow, not a bigger hole.
    • Rainwater should not be run into a septic tank, a treatment plant, or its drainage field. Keep the two systems separate.
    • A soakaway shown “for costing only” on a drawing is a placeholder, not a design. Do not build it until it has been tested and designed.

    A common way it goes wrong

    This is a pattern, not a single case. A drawing shows a soakaway with a note such as “soakaway for costing only, design and test to follow”. The note is there because nobody has tested the ground yet. The groundworker prices a pit, the test is treated as someone else’s job, and the pit is dug to the size on the drawing. Sometimes the roof water and the outlet from a treatment plant are both piped into it to save a trench.

    On free-draining sand or gravel, that may get away with it. On clay, the first long spell of wet weather fills the pit faster than the ground can take the water away. The pit overflows, the ground around it stays waterlogged, and water can back up the pipes. The fix is a dig-up, a new design, and a delay, all of which a test at the start would have avoided.

    Where surface water is allowed to go

    Requirement H3 of the Building Regulations covers rainwater from roofs and paved areas, and it sets an order of priority for where that water goes. First, an adequate soakaway or other infiltration system. Where that is not reasonably practicable, a watercourse. Only where that is not reasonably practicable either, a sewer. Approved Document H is the government’s guidance on how to meet it.

    The important words are “adequate” and “reasonably practicable”. Whether a soakaway would be adequate has to be shown, not assumed, and an infiltration test is how you show it. If the test shows the ground cannot take the water at a useful rate, that is the reason to move down the list, not a reason to build the soakaway anyway.

    Moving down the list brings its own permissions. A new outfall to a watercourse needs the agreement of whoever owns the land it crosses. On an ordinary watercourse, a new outfall or other work in the channel may also need consent from Kirklees Council as the Lead Local Flood Authority. Work on or near a main river is a matter for the Environment Agency. Some small watercourses around Huddersfield run in culverts under gardens and roads, so finding the watercourse can be the first job. A new connection to a public sewer has to be applied for through the sewerage company, which around Huddersfield is Yorkshire Water, and rainwater should not go into a sewer that carries only foul water. On new houses, a planning condition may also set how much water can leave the site and how fast.

    The surface water test: BRE Digest 365

    BRE Digest 365, Soakaway design, is the design method most often used for surface water soakaways, and the one Building Control commonly asks to see. A trial pit is dug on the line of the proposed soakaway, to about the depth it will be built, filled with water, and allowed to drain. This is done three times, and the time the water takes to fall between two set levels is recorded each time. From those times, the soil infiltration rate is worked out.

    That infiltration rate, the area of roof and paving draining to the soakaway, and a design rainstorm are then used to size the soakaway so that it can hold the water from the storm while the ground takes it away, and empty again in a reasonable time before the next one. On sand and gravel, the numbers usually work at a sensible size. On clay, the water may barely drop during the test, and the soakaway needed becomes impractically large, or the test shows infiltration is not a realistic option at all. The base of the soakaway also has to stay above the highest winter groundwater level, which a test done in a dry summer can miss.

    When the test shows that a soakaway will not work, it has done its job. It has told you, before anything has been built, that you need a different design. That usually means a connection to a watercourse or sewer, often with underground storage that lets the water out slowly.

    The effluent test: Approved Document H percolation test

    If a property has a septic tank or a package treatment plant, the effluent usually goes to a drainage field: perforated pipes laid in gravel-filled trenches that spread it slowly through the ground. The test for a drainage field is a different one, set out in Approved Document H. A trial hole is dug first to check the groundwater level. Small test holes are then dug below the level of the proposed trenches, soaked, refilled, and timed as the water drains. The result is a percolation value, called Vp, which shows whether the ground is suitable for a drainage field at all and, if it is, how large the field needs to be.

    So there are two tests with two different results: a BRE 365 infiltration rate for rainwater, and a Vp for effluent. If a drawing or a report mixes them up, ask which test was done and what it was done for.

    In England, discharging septic tank or treatment plant effluent to the ground must either meet the Environment Agency’s general binding rules for small sewage discharges or be covered by an environmental permit. Those rules expect the discharge to go through a properly designed drainage field, not a soakaway pit, and a new private system may not meet them where a public foul sewer is close by. Check this before the system is designed.

    Clay, and ground around Huddersfield

    Clay is a fine-grained soil that water moves through very slowly. In a test on heavy clay, the water level can barely move over hours. The same is often true of the weathered mudstones and glacial till found in many parts of the district around Huddersfield. Sandstone can drain well, but it can also be patchy, with water running along cracks in the rock rather than soaking evenly into it, and it can come out again lower down the hill: at a spring line, in a neighbour’s garden, or through a cellar wall.

    Parts of the district also have a legacy of old, shallow coal workings. Check the coal mining report for the address before a soakaway is designed. Where shallow workings are recorded, putting water into the ground needs particular care and may not be acceptable.

    Slopes and made ground matter too. On a hillside, a soakaway uphill of a house can send water towards its foundations or into its cellar, and one near a retaining wall adds water pressure behind a wall that was never designed for it. Filled ground can settle when it is soaked. Approved Document H gives guidance on siting, including keeping soakaways away from buildings and out of unstable ground. The rest is engineering judgement for the particular site, and it belongs in the design, not on the day of digging.

    On slow-draining ground, the honest answer is often that a soakaway will not work. Accept that early and the project moves on by a different route. The alternative is to build it, watch it fail, and then have the conversation next to a waterlogged pit.

    Keep rainwater and effluent apart

    A drainage field is sized for the effluent from the house, not for rainwater from the roof. Sending rainwater into a septic tank, a treatment plant, or its drainage field overloads it, can flush partly treated effluent through, and on slow-draining ground makes a failure far more likely. Rainwater and effluent need their own systems, each tested, designed, and sited for its own job.

    What “for costing only” means

    Drawings sometimes carry notes such as “soakaway for costing only, design to follow” or “indicative drainage layout, subject to ground investigation”. These notes mean the designer did not yet have the site information needed to design it. They are not permission to build.

    Before a soakaway is built, you need a result from the right test, a design based on that result, and, where the work falls under the Building Regulations, confirmation that Building Control is satisfied with it. If any of these is missing, do not build it yet.

    When to get an engineer involved

    Drainage on conversions, extensions, and self-builds often falls between packages, with the designer, the groundworker, and the treatment plant supplier each assuming someone else has it covered. Get the drainage designed before the groundworks start, not after. If a soakaway has already been built and is slow to empty or overflows in wet weather, have it checked before it fails completely, and do not connect anything more to it in the meantime.

    I design soakaways, drainage fields, and the alternatives when a soakaway will not work, from test results you provide. The tests themselves, BRE 365 or percolation, are carried out by a separate specialist.

    This post is general information about how soakaways and drainage fields are tested and designed. It is not a design for your site, which depends on your own test results, ground, and layout.


    Need expert eyes on your project?

    I am a Chartered Structural Engineer (CEng, MIStructE) based in Huddersfield. The Beam Doctor offers homeowners and builders:

    • Drainage design — foul drainage layouts, soakaway design from your test results, build-over and build-near support, and surface water design. Desk-based, from the information you provide. Site testing is not included; it is carried out by a separate specialist. See all services and current fees →
    • Steel beam (RSJ) calculations — Eurocode-compliant, Building Control-ready, 5 working days from acceptance and receipt of all the information needed. Desk-based, from the information you provide. See all services and current fees →
    • On-site attendance — a Chartered Engineer at your property, tiered by duration. A brief verbal summary on site, then site visit notes within 2 working days: photographs, annotated sketches, and anything still needed for the design. The notes are a record of the visit, not a report. See site visit fees →

    Current fees for every service are listed on the services page.

  • Why Your New House Needs Deeper Foundations Than You’d Expect

    Why Your New House Needs Deeper Foundations Than You’d Expect

    You’ve got planning permission, you’ve chosen your plot, and you’re ready to start building. But if your ground is clay and there are mature trees nearby, the depth of your foundations isn’t something you can estimate from a standard detail — it’s something the ground itself dictates, and getting it wrong in either direction costs you.

    Key Takeaways

    • On shrinkable clay soil, foundation depth is governed by ground conditions and tree proximity — not by the size or weight of the building above.
    • Three factors drive the required depth: the clay’s plasticity (its volume-change potential), the water demand of nearby tree species, and the ratio of distance to mature tree height.
    • A site-specific geotechnical investigation — trial pits or boreholes with soil classification and plasticity testing — is what fixes the design depth. A desk study alone won’t do it, and Building Control won’t accept assumptions.
    • The realistic outcome on high-plasticity clay near mature trees is a foundation significantly deeper than the “typical” 900 mm — often with additional heave precautions built in.
    • Commission the ground investigation and get the foundation design confirmed by a structural engineer before you submit drawings to Building Control, not after.

    The assumption that catches self-builders out

    I was asked to design the foundations for a pair of new houses — one semi-detached, one detached — with garages, on a sloping plot in the East of England. The subsoil was firm, expansive, shrinkable clay. There were mature trees close to the building footprint. On paper, these were modest two-storey houses. Nothing unusual about the superstructure. But the ground changed everything.

    The most common mistake I see at this stage is the assumption that a two-storey house gets “two-storey house foundations.” People — and sometimes builders — reach for a standard detail: a trench-fill to 900 mm, maybe 1.0 m to be safe, and they move on. On stable, non-shrinkable ground with no trees nearby, that might be perfectly adequate. On shrinkable clay with mature trees in the vicinity, it can be a serious under-design. The house gets built, the trees keep growing, the clay keeps cycling through wet and dry seasons, and three or four years later the cracking starts.

    The other mistake is over-building blindly — going very deep without understanding why, which wastes money and still doesn’t prove to Building Control that the design is justified. What fixes the depth is evidence: a proper site investigation that characterises the ground and lets you apply the correct design framework.

    Why clay soil behaves differently

    Clay is a volume-change material. In wet conditions it swells (heave); in dry conditions it shrinks. The degree to which it does this is measured by its plasticity index — a laboratory result from the site investigation that classifies the soil as low, medium, or high plasticity. High-plasticity clay moves more, and the foundation depth required to get below the active zone of seasonal movement increases accordingly.

    In the UK, much of the Midlands, the South East, and parts of Yorkshire sit on shrinkable clay geology. If you’re building on it, this isn’t a rare or unusual problem — it’s the normal design condition for that ground. The issue is that it’s invisible. You can’t see plasticity index by looking at the soil. You can’t feel heave potential. You need a test.

    Shrinkable clay is classified under a well-established framework. The design guidance I work to — including BS 8004 and Eurocode 7 (BS EN 1997) for geotechnical design — requires that the soil be properly characterised before you set a foundation depth. On this job, that meant commissioning trial pits with laboratory testing to establish the plasticity of the clay at the relevant depths. That result, combined with the tree data, was what drove the design.

    What trees actually do to the ground

    Trees extract moisture from the soil through their root systems. On shrinkable clay, that moisture extraction causes the clay to shrink — sometimes significantly — in the zone around and beneath the tree. When the tree is removed or dies, the clay rehydrates and swells back. Both movements — shrinkage during the tree’s life and heave if it’s ever removed — are risks to a foundation that isn’t deep enough to sit below the active zone.

    The NHBC Standards Chapter 4.2, “Building near trees,” provides the framework that governs minimum foundation depths in this situation. It’s the standard I applied on this job and the one Building Control will expect to see referenced in your submission. Three things feed into it:

    • Soil classification: The plasticity index from your site investigation places the clay in a low, medium, or high volume-change category.
    • Tree species: Different species have different water demands. High-demand species — oaks, willows, poplars — require greater foundation depths than low-demand ones at the same distance.
    • Distance-to-mature-height ratio: The zone of influence is defined by comparing the horizontal distance from the tree to the building against the tree’s mature height. The closer the tree relative to its mature height, the greater the required depth.

    On this plot, the combination of high-plasticity clay and mature trees at relatively close proximity meant the required foundation depth was well beyond what a standard detail would have provided. That’s not unusual on this type of ground — it’s the expected outcome when you do the calculation properly.

    What the foundation design actually looked like

    The design outcome for this job was a deepened trench-fill foundation, taken to a depth justified by the site investigation results and the NHBC 4.2 tree-influence calculation. On the side of the foundation facing the clay that could heave — particularly relevant where trees might be removed in future, or where seasonal swelling was a risk — compressible board was specified between the concrete and the soil. That board accommodates ground movement without it being transmitted directly into the foundation structure.

    This is standard practice on expansive clay, but it has to be designed in from the start. You can’t easily retrofit heave precautions once the foundation is poured. The compressible board, the concrete mix, the reinforcement (if any), the depth — all of these are set by the design, which is set by the investigation.

    The Building Control submission included the geotechnical report, the plasticity test results, the NHBC 4.2 tree-influence calculations, and the foundation design drawings. That’s what a compliant submission looks like on this ground. A drawing that says “1.0 m trench-fill, typical” with no supporting investigation data won’t get through, and nor should it.

    What this means if you’re planning a new build or extension

    If your plot is on clay — or if you’re not sure what your subsoil is — and there are trees of any significant size within roughly one to one-and-a-half times their mature height of your building footprint, you need a geotechnical investigation before you finalise your foundation design. Not as a box-ticking exercise, but because the investigation result is literally the input data for the design. Without it, you’re guessing. And on shrinkable clay near trees, guessing costs you — either in wasted concrete going too deep without justification, or in cracked walls and remedial underpinning years later because you didn’t go deep enough.

    The investigation itself — trial pits, soil sampling, plasticity testing — is a relatively modest cost in the context of a new build. It’s the one piece of information that fixes the foundation depth, satisfies Building Control, and gives you and your builder confidence that what’s going into the ground is right for the ground it’s going into.

    Self-builders in particular sometimes try to skip this step, especially on smaller projects or single-storey extensions. I understand the instinct — it feels like an extra cost on top of everything else. But I’ve seen the consequences of skipping it, and the remedial work is always more expensive than the investigation would have been.

    When to call a structural engineer

    If you’re commissioning a new build or extension on clay ground, with trees anywhere near the footprint, you need a structural engineer involved before the foundation design is fixed — ideally before the geotechnical investigation is scoped, so the right tests are specified. You also need that engineer to translate the investigation results into a Building Control-ready foundation design with supporting calculations. Foundation depth near trees on clay soil is not a situation where a builder’s experience or a standard detail is sufficient. The ground investigation and the engineering design need to work together, and both need to be in your Building Control submission.


    Need expert eyes on your project?

    I am a Chartered Structural Engineer (CEng, MIStructE) based in Huddersfield. The Beam Doctor offers homeowners and builders:

    • Steel beam (RSJ) calculations — Eurocode-compliant, Building Control-ready, 5 working days from acceptance and receipt of all the information needed. See all services and current fees →
    • Defect investigation — I attend your property, inspect the cracking or movement, and give you a written opinion on the likely cause, or, where one visit cannot settle it, what monitoring or further investigation is needed. The site visit is included in the price. Monitoring, if it is needed, is priced separately. I take on a limited number of these, and I will confirm whether I can take yours once you have answered a few scoping questions. The report is for your own decisions. I do not take on reports that a lender, valuer, or buyer will rely on. At present I also do not take on reports that an insurer will rely on, or that are to be put to another party, such as a builder or neighbour, to establish what caused the damage. See the fee bands →
    • Structural Engineer’s Report — a signed desk-based opinion on a single structural concern, for your own decisions about the building. Not for a lender, valuer, buyer, or insurer to rely on. If the question is what is causing cracking or movement, Defect Investigation is the right service. Request a report →
    • On-site attendance — a Chartered Engineer at your property, tiered by duration. See site visit fees →

    Current fees for every service are listed on the services page.

  • Removing Your Chimney Breast: Why Party Wall and Temporary Support Matter

    Removing a chimney breast sounds simple: take out the brickwork, put in a beam, redecorate. But a chimney breast is part of a column of masonry that can run from the ground floor to above the roof, and on many semi-detached and terraced houses it is shared with the house next door. Take out the wrong part in the wrong order and a great deal of brickwork is left with nothing holding it up.

    This is general guidance on how chimney breasts are usually built and removed. It is not advice on your home: I have not seen your property, and every house is different.

    Key Takeaways

    • A chimney breast carries the weight of everything above it: any breast on the floor above, the stack in the loft, and the stack above the roof. Whatever stays has to be supported by something else once the breast below it goes.
    • What needs supporting, and how, depends on which parts you remove and which you keep. That has to be designed before work starts.
    • Many chimney stacks sit on or in a party wall shared with a neighbour. The Party Wall etc. Act 1996 will usually apply, and what your neighbour has already done on their side affects the design.
    • Steel “gallows” brackets are increasingly rejected by Building Control. Where they are proposed, they have to be justified by calculation and testing.
    • The retained masonry must never be left unsupported, even for a short time. The propping sequence should be specified before a builder starts, not worked out on the day.
    • In England, removing a chimney breast is normally building work under the Building Regulations, because it alters the structure. When it is, it has to go through Building Control.

    What a chimney breast is holding up

    A chimney breast is not just decorative brickwork. It is a heavy column of masonry that carries the weight of everything built on top of it: the breast on the floor above if there is one, the stack as it passes through the loft, and the stack that sticks out above the roof. All of that weight comes down through the breast to the foundations.

    When you take out a breast on a lower floor, the masonry above it does not become lighter. It still needs something to stand on. The job of the design is to give it a new, safe route down to the ground, or to remove it altogether.

    Which parts come out changes what needs supporting

    There is no single answer, because it depends on what you remove and what you keep. Broadly:

    • One floor only. If you remove the breast on one floor and keep everything above it, the retained masonry above needs a new support, usually a beam or lintel designed to carry it, bearing onto walls that can take the load. Because the breast sticks out from the wall, its weight sits off-centre on the support, and the design has to allow for that.
    • More than one floor, keeping the stack. If you remove the breasts on more than one floor but keep the stack in the loft and above the roof, that stack still has to be carried, usually on steel beams at loft floor level bearing into the walls. Ceiling joists are not built to carry it. Stacks in lofts are often corbelled (stepped out) or set over at an angle towards the ridge, so the weight may not sit directly above where the breast was, and the support has to allow for that. With nothing below it any more, the part above the roof still has to resist wind, so its condition and how it is held at loft level need checking too.
    • The whole chimney. Taking the chimney out completely removes the load, but it has to come down from the top: the stack above the roof first, then the stack in the loft, then each breast in turn, working down. When the whole chimney is coming out, never take out a lower breast while masonry is still standing above it. The roof then needs making good, and checking: in many older houses a purlin or other roof timber bears on the stack or the wall beside it, and loses its support when the stack goes. If the stack is shared with your neighbour, you will usually need their agreement to take it down, because part of it is theirs and their flues may run through it. Without that, the stack may have to stay and be supported instead. Serving a party wall notice is not the same as having that agreement; a party wall surveyor can advise on both.

    In each case, the walls that the new support bears onto have to be checked too. A beam is only as good as what it sits on.

    The floors need checking as well. Floor joists are usually cut short around a chimney breast and carried on a timber trimmer, and in some houses the joists or the trimmer bear directly on the breast. They have to be given new support before the breast comes out, not after.

    A note on gallows brackets

    A common way of supporting a retained stack has been steel “gallows” brackets bolted to the wall below it. They are increasingly rejected by Building Control, because they depend entirely on the strength of old masonry that often cannot be checked, such as a thin party wall or a stone wall with a rubble core. Where they are proposed, they have to be justified by calculation and by testing how well the fixings hold in the wall. If Building Control does not accept them, the support may have to be redesigned. It is often better to design a beam from the start.

    Shared stacks and party walls

    On many semi-detached and terraced houses, the chimney stack sits on or within the wall you share with your neighbour. Two things follow.

    First, the law. If the work affects a party wall or a shared stack, the Party Wall etc. Act 1996 will usually mean you must serve notice on the owner of the house next door (which may be a landlord rather than whoever lives there) before the work starts. A party wall surveyor can advise you on what is needed. Arranging this is the homeowner’s responsibility, and it is worth starting early.

    Second, the design. Whether your neighbour has already removed their own chimney breast, and how, changes what the shared stack is sitting on. That needs to be known before the design is finalised, not discovered on the day.

    Temporary support: the part that must be planned

    The most dangerous moment is during the work. If a breast is taken out before the masonry above it has proper support, that masonry can move or drop without warning, onto whoever is working underneath.

    The engineer’s design should set out the propping sequence before work starts: where the retained masonry needs propping, in what order each part comes out, and when the new permanent support must be fully in place and carrying load before any props are removed. Propping is usually done with adjustable steel props and short steel needles set into slots cut in the masonry above. Props must stand on something that can take the load: on a timber floor, that means spreading it and carrying it down through the floors below to solid ground. Nothing should be cut through a party wall into your neighbour’s side without the party wall process in place. Choosing the props, deciding what they stand on, and putting them in and taking them out is the builder’s job, but they should be following a written sequence, not improvising.

    If you are getting quotes, ask each builder how they plan to support the chimney above while they work. Their answer will tell you a lot.

    What the engineer will need to know

    To design the supports, an engineer will usually need:

    • Which breasts you want to remove, on which floors, and whether the stack above the roof is staying.
    • Floor-to-ceiling heights, and the height of the stack in the loft and above the roof.
    • What the breast and the walls around it are built from, and how thick they are.
    • Which way the floor joists run, because that affects how the floor is supported around the opening.
    • Whether the stack is shared, and whether your neighbour has removed their breast.
    • Whether any breast in the house has already been removed in the past.

    Some of this can come from drawings and photographs. Some, such as joist direction and what is hidden behind plaster, may need a visit.

    Building Regulations and other things to check

    In England, removing a chimney breast is normally building work under the Building Regulations, because it alters the structure. When it is, it has to go through Building Control before work starts, and once it is finished and signed off, you should receive a completion certificate (a final certificate if you used a private approver). Keep it: a buyer’s solicitor is likely to ask for it when you sell. Building Control will normally ask for structural calculations for the new supports.

    Before any work, have any gas fire or appliance disconnected and the flue made safe by a Gas Safe registered engineer. In homes built or refurbished before 2000, some boards and old fireplace materials can contain asbestos, so have anything you are unsure about tested by a qualified asbestos surveyor. If your neighbour still uses a flue in the shared stack, or another fireplace or boiler in your own house does, that flue must not be damaged or blocked, including by rubble falling into it. A damaged flue can let fumes, including carbon monoxide, into either house, so it should be checked by a suitably registered engineer after the work.

    If your house is listed, removing a chimney breast is likely to need listed building consent. If it is in a conservation area, check with the council’s planning department before taking down a stack that can be seen from outside.

    If a breast was removed in the past

    Many older houses have had a chimney breast removed at some point, sometimes with no paperwork. Start by comparing the floors. If a breast is missing on one floor but there is still a breast on the floor above, a stack in the loft, or a stack above the roof, something should be holding that masonry up. Often it is hidden above a ceiling, so you may not be able to see what it is. If you look in the loft, only do so if it is safe to get into, step only on boards or joists, never on the ceiling between them, and do not disturb loose insulation, which in older houses can contain asbestos. Signs that it may not be properly supported include cracking in the ceiling or walls around where the breast used to be, a sagging ceiling or floor near that spot, and a stack above the roof that leans or is cracked. Having no cracks does not prove the masonry is supported: old brick and stonework can hold itself up by arching for years before it moves. If a stack remains above a removed breast and you cannot confirm what supports it, an engineer should look at it, and the support may need putting right. Assessing a removal that has already happened needs a visit to the house; it cannot be done from photographs.

    When it cannot wait

    If, during or after chimney work, you see new cracks opening, a ceiling sagging, masonry moving, or the stack above the roof leaning, keep people away, stop any work, and do not try to prop or repair it yourself. Do not take out any props that are already in place. If collapse looks imminent or anyone is hurt, call 999. If anything could fall onto a road or path, contact your council’s Building Control dangerous structures service. Then get a structural engineer to look as soon as you can, and if a builder is working on the house, ask them to put in temporary support through their engineer straight away. If you smell gas, leave the building and call the National Gas Emergency Service on 0800 111 999.

    When to call a structural engineer

    Speak to a structural engineer before you remove any chimney breast. It matters most if the stack is shared, if you are removing breasts on more than one floor, if the stack above the roof is staying, if you think your neighbour’s breast may already be gone, or if a breast in your house was removed in the past without paperwork. Bring the engineer in early, let the party wall process run alongside the design, and make sure the propping sequence is written down before anyone starts.


    Need expert eyes on your project?

    I am a Chartered Structural Engineer (CEng, MIStructE) based in Huddersfield. The Beam Doctor offers homeowners and builders:

    • Chimney breast removal calculations — for a planned removal: a design for the new supports, a calculation of the load from the masonry that stays and a check of the walls it bears on (or, where the whole chimney comes out, a check of the roof it leaves behind), and a written propping and needling sequence for your builder to follow. Site attendance, where it is needed, is charged separately. Not included: Building Control fees; party wall notices, surveying, and awards; and the builder’s propping and demolition. See the chimney breast fee bands →
    • On-site attendance — a Chartered Engineer at your property, tiered by duration. A brief verbal summary on site, then site visit notes within 2 working days: photographs, annotated sketches, and anything still needed for the design. The notes are a record of the visit, not a report. See site visit fees →

    Current fees for every service are listed on the services page.