
Category: Blog

Your blog category

  • Why Your Soakaway Will Fail on Clay Without This Simple Test First

    Why Your Soakaway Will Fail on Clay Without This Simple Test First

    If you’re building off mains drainage — whether that’s a barn conversion, a rural new build, or an extension with a new drainage run — the question of where your water goes matters enormously. A soakaway sounds simple, but on the wrong ground it will fail, and the test that tells you whether your ground is the right ground costs a fraction of the bill you’ll face if you skip it.

    Key Takeaways

    • A soakaway is a designed drainage structure, not just a hole in the ground — it must be sized against a measured soil infiltration rate.
    • The only way to know whether your subsoil can accept a soakaway is a percolation test carried out before construction, following BRE Digest 365.
    • Heavy clay has very low permeability — on clay, infiltration often fails the test entirely, and you must move to an alternative: attenuation with controlled release, or a consented discharge to a watercourse.
    • Surface water must never be combined with treated foul effluent from a package treatment plant; each stream needs its own separately designed and tested drainage field.
    • A soakaway sized “for costing purposes” is not a designed soakaway — treating it as one is how expensive failures happen.

    How one skipped test became an expensive rebuild

    The job that prompted this article was a Class Q barn conversion in the East of England — an agricultural building being converted to a dwelling, sitting well outside any mains drainage network. Surface water from the roof and hardstanding was to discharge to a soakaway. Foul drainage was handled by a package treatment plant, with its treated effluent also discharging to ground.

    The drainage drawing was honest. It carried a clear note: “soakaway for costing only — design and percolation test to be confirmed before construction.” That note existed for good reason. The engineer who produced the drawing knew the ground hadn’t been tested and that the subsoil in that area was likely to be heavy, low-permeability clay. The note was a flag, not a green light.

    What happened next is unfortunately common. The contractor priced the pit, treated the percolation test as someone else’s responsibility, and built a single soakaway to accept both the surface water and the treatment plant’s effluent combined. No percolation test was ever done. After the first prolonged period of heavy rain, the soakaway surcharged. Water backed up, the ground around the pit became saturated, and the system failed visibly. The subsoil was exactly what the note had warned about: heavy clay that water simply cannot disperse through at any useful rate.

    The result was an expensive dig-up, a redesigned drainage scheme, and a delay to occupation. Every penny of that cost was avoidable. The percolation test that would have caught this costs a small fraction of what the remedial work cost.

    What Approved Document H actually says

    Part H of the Building Regulations covers drainage and waste disposal. It sets out a clear hierarchy for surface water disposal, and it matters because it isn’t optional — it’s the regulatory framework your drainage scheme must follow.

    The hierarchy runs in this order: infiltration to the ground first (a soakaway or drainage field), then discharge to a surface watercourse, and only as a last resort, connection to a public sewer. The intent is to manage surface water as close to source as possible and to reduce pressure on combined sewer systems.

    Crucially, Approved Document H doesn’t say “build a soakaway if you have space.” It says infiltration is the preferred option — but only where the ground is suitable. Suitability has to be demonstrated, not assumed. That demonstration is the percolation test. If the test shows the ground cannot accept water at an adequate rate, you don’t get to build a soakaway and hope for the best. You move down the hierarchy to the next option.

    This is the step that was skipped on the barn conversion. Nobody tested the ground, so nobody knew the hierarchy required them to move straight to option two. A consented discharge to a watercourse — requiring agreement from the Lead Local Flood Authority and potentially the Environment Agency — would have been the correct route. It takes longer to arrange. It costs more to design. But it works.

    The percolation test: what it is and why it has to come first

    BRE Digest 365 is the established method for soakaway design in the UK. It’s what Building Control will expect to see referenced in your drainage calculations, and it’s what any competent drainage engineer will use.

    The process starts with a trial pit — typically 300 mm square, dug to the proposed invert level of the soakaway. The pit is filled with water and allowed to drain. This is repeated several times to saturate the surrounding soil before the actual measurement is taken. You then measure how long it takes for the water level to drop by a set amount. From that, you calculate the soil infiltration rate, expressed as a value called Vp — the time in seconds for water to drop 1 mm.

    That infiltration rate is then used to size the soakaway storage volume. The design storm is typically the 1-in-10-year rainfall event for your area, and the soakaway must be large enough to store the peak inflow while the ground slowly absorbs it. On permeable sandy or gravelly subsoils, the numbers work comfortably. On heavy clay, the measured Vp is so high — meaning water drains so slowly — that the required storage volume becomes impractically large, or the test fails the infiltration criteria altogether.

    When the test fails, that’s not a problem with the test. That’s the test doing its job. It’s telling you the ground cannot support a soakaway, and that you need to design something else before you start digging.

    Clay subsoil: why infiltration so often fails

    Clay is a fine-grained soil with very low hydraulic conductivity. Water moves through it extremely slowly — sometimes almost not at all. In a percolation test on heavy clay, you’ll often see the water level barely drop over the measurement period. The calculated infiltration rate comes back so poor that no practical soakaway could be designed to meet it.

    This isn’t unusual in large parts of England. Much of East Anglia, the Midlands, and parts of Yorkshire sit on clay-dominant geology. If your project is in one of these areas and you’re planning a soakaway without a percolation test, you are taking a significant risk.

    The honest engineering answer on heavy clay is usually this: a soakaway won’t work here. Accept that early, design accordingly, and the project still moves forward — just via a different drainage route. The alternative is to build the soakaway anyway, watch it fail, and then have that conversation while standing next to a waterlogged pit and a builder asking who’s paying to fix it.

    The second mistake: mixing surface water with treated foul effluent

    The barn conversion made a second error that compounded the first: surface water and the treated effluent from the package treatment plant were directed into the same soakaway.

    These two streams must be kept separate, and Approved Document H is clear on this. A package treatment plant discharges treated effluent to a drainage field — a network of perforated pipes laid in gravel trenches, designed to distribute effluent slowly across a large area of subsoil. The sizing of that drainage field is governed by its own separate porosity test, carried out to a different method (referenced in Part H and in BS 6297), and the drainage field must be sited away from watercourses, boundaries, and buildings.

    A surface water soakaway and a foul drainage field are not interchangeable. Combining them overloads both the hydraulic capacity and the biological treatment process. On clay, where neither stream can disperse effectively anyway, the result is rapid saturation and failure.

    If you’re installing a package treatment plant, commission the porosity test for the drainage field as a completely separate exercise from any surface water drainage design. They are different structures, tested differently, sized differently, and located differently.

    What “for costing only” actually means

    Drawings sometimes carry notes like “soakaway — for costing only, design TBC” or “indicative drainage layout — subject to ground investigation.” These notes exist because the engineer producing the drawing doesn’t yet have the site data needed to produce a proper design. They are not permission to build.

    A soakaway shown on a drawing without a tested infiltration rate and a calculated storage volume is a placeholder. It tells your quantity surveyor there will be a soakaway somewhere so they can allow a budget line. It does not tell your groundworker to dig a pit of that size in that location and connect it up.

    Before any soakaway is built, you need: a percolation test result, a soakaway design based on that result, and confirmation from Building Control that the design is acceptable. If any of those three things are missing, the soakaway should not be built. The cost of getting them in place is small relative to the cost of building something that fails.

    When to call a structural engineer

    Drainage design for off-mains properties sits at the intersection of civil engineering, Building Regulations, and planning conditions — and it’s easy for things to fall between the gaps on self-build and conversion projects where different contractors handle different packages. If you’re taking on a rural conversion or new build without mains drainage connections, get a drainage engineer or structural engineer involved before groundworks start, not after. If your soakaway has already been built and is showing signs of surcharging or slow drainage, don’t wait for a full failure — get a professional assessment of whether the drainage scheme is fit for purpose and what the compliant alternatives are. The soakaway percolation test before building is the cheapest insurance you can buy on an off-mains drainage project.


    Need expert eyes on your project?

    I am a Chartered Structural Engineer (CEng, MIStructE) based in Huddersfield. The Beam Doctor offers homeowners and builders:

    • Steel beam (RSJ) calculations — Eurocode-compliant, Building Control-ready, in 5 working days. See all services and current fees →
    • Defect investigation — I attend your property, inspect the cracking or movement, and give you a written opinion on the cause. The site visit is included in the price. See the fee bands →
    • Structural Engineer’s Report — a signed desk-based opinion on a single structural concern, for a mortgage lender or an insurance claim. Request a report →
    • On-site attendance — a Chartered Engineer at your property, tiered by duration. See site visit fees →

    Current fees for every service are listed on the services page.
  • Why Your New House Needs Deeper Foundations Than You’d Expect

    Why Your New House Needs Deeper Foundations Than You’d Expect

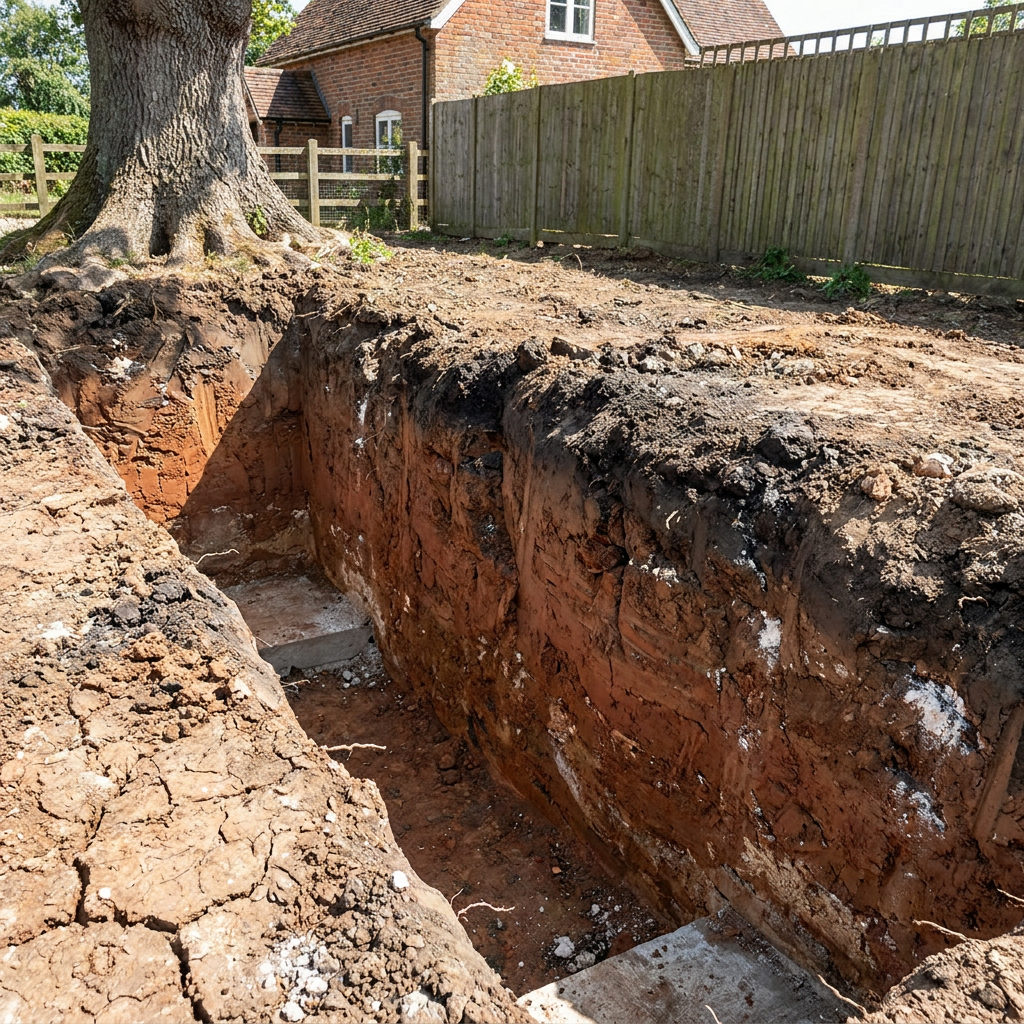
    You’ve got planning permission, you’ve chosen your plot, and you’re ready to start building. But if your ground is clay and there are mature trees nearby, the depth of your foundations isn’t something you can estimate from a standard detail — it’s something the ground itself dictates, and getting it wrong in either direction costs you.

    Key Takeaways

    • On shrinkable clay soil, foundation depth is governed by ground conditions and tree proximity — not by the size or weight of the building above.
    • Three factors drive the required depth: the clay’s plasticity (its volume-change potential), the water demand of nearby tree species, and the ratio of distance to mature tree height.
    • A site-specific geotechnical investigation — trial pits or boreholes with soil classification and plasticity testing — is what fixes the design depth. A desk study alone won’t do it, and Building Control won’t accept assumptions.
    • The realistic outcome on high-plasticity clay near mature trees is a foundation significantly deeper than the “typical” 900 mm — often with additional heave precautions built in.
    • Commission the ground investigation and get the foundation design confirmed by a structural engineer before you submit drawings to Building Control, not after.

    The assumption that catches self-builders out

    I was asked to design the foundations for a pair of new houses — one semi-detached, one detached — with garages, on a sloping plot in the East of England. The subsoil was firm, expansive, shrinkable clay. There were mature trees close to the building footprint. On paper, these were modest two-storey houses. Nothing unusual about the superstructure. But the ground changed everything.

    The most common mistake I see at this stage is the assumption that a two-storey house gets “two-storey house foundations.” People — and sometimes builders — reach for a standard detail: a trench-fill to 900 mm, maybe 1.0 m to be safe, and they move on. On stable, non-shrinkable ground with no trees nearby, that might be perfectly adequate. On shrinkable clay with mature trees in the vicinity, it can be a serious under-design. The house gets built, the trees keep growing, the clay keeps cycling through wet and dry seasons, and three or four years later the cracking starts.

    The other mistake is over-building blindly — going very deep without understanding why, which wastes money and still doesn’t prove to Building Control that the design is justified. What fixes the depth is evidence: a proper site investigation that characterises the ground and lets you apply the correct design framework.

    Why clay soil behaves differently

    Clay is a volume-change material. In wet conditions it swells (heave); in dry conditions it shrinks. The degree to which it does this is measured by its plasticity index — a laboratory result from the site investigation that classifies the soil as low, medium, or high plasticity. High-plasticity clay moves more, and the foundation depth required to get below the active zone of seasonal movement increases accordingly.

    In the UK, much of the Midlands, the South East, and parts of Yorkshire sit on shrinkable clay geology. If you’re building on it, this isn’t a rare or unusual problem — it’s the normal design condition for that ground. The issue is that it’s invisible. You can’t see plasticity index by looking at the soil. You can’t feel heave potential. You need a test.

    Shrinkable clay is classified under a well-established framework. The design guidance I work to — including BS 8004 and Eurocode 7 (BS EN 1997) for geotechnical design — requires that the soil be properly characterised before you set a foundation depth. On this job, that meant commissioning trial pits with laboratory testing to establish the plasticity of the clay at the relevant depths. That result, combined with the tree data, was what drove the design.

    What trees actually do to the ground

    Trees extract moisture from the soil through their root systems. On shrinkable clay, that moisture extraction causes the clay to shrink — sometimes significantly — in the zone around and beneath the tree. When the tree is removed or dies, the clay rehydrates and swells back. Both movements — shrinkage during the tree’s life and heave if it’s ever removed — are risks to a foundation that isn’t deep enough to sit below the active zone.

    The NHBC Standards Chapter 4.2, “Building near trees,” provides the framework that governs minimum foundation depths in this situation. It’s the standard I applied on this job and the one Building Control will expect to see referenced in your submission. Three things feed into it:

    • Soil classification: The plasticity index from your site investigation places the clay in a low, medium, or high volume-change category.
    • Tree species: Different species have different water demands. High-demand species — oaks, willows, poplars — require greater foundation depths than low-demand ones at the same distance.
    • Distance-to-mature-height ratio: The zone of influence is defined by comparing the horizontal distance from the tree to the building against the tree’s mature height. The closer the tree relative to its mature height, the greater the required depth.

    On this plot, the combination of high-plasticity clay and mature trees at relatively close proximity meant the required foundation depth was well beyond what a standard detail would have provided. That’s not unusual on this type of ground — it’s the expected outcome when you do the calculation properly.

    What the foundation design actually looked like

    The design outcome for this job was a deepened trench-fill foundation, taken to a depth justified by the site investigation results and the NHBC 4.2 tree-influence calculation. On the side of the foundation facing the clay that could heave — particularly relevant where trees might be removed in future, or where seasonal swelling was a risk — compressible board was specified between the concrete and the soil. That board accommodates ground movement without it being transmitted directly into the foundation structure.

    This is standard practice on expansive clay, but it has to be designed in from the start. You can’t easily retrofit heave precautions once the foundation is poured. The compressible board, the concrete mix, the reinforcement (if any), the depth — all of these are set by the design, which is set by the investigation.

    The Building Control submission included the geotechnical report, the plasticity test results, the NHBC 4.2 tree-influence calculations, and the foundation design drawings. That’s what a compliant submission looks like on this ground. A drawing that says “1.0 m trench-fill, typical” with no supporting investigation data won’t get through, and nor should it.

    What this means if you’re planning a new build or extension

    If your plot is on clay — or if you’re not sure what your subsoil is — and there are trees of any significant size within roughly one to one-and-a-half times their mature height of your building footprint, you need a geotechnical investigation before you finalise your foundation design. Not as a box-ticking exercise, but because the investigation result is literally the input data for the design. Without it, you’re guessing. And on shrinkable clay near trees, guessing costs you — either in wasted concrete going too deep without justification, or in cracked walls and remedial underpinning years later because you didn’t go deep enough.

    The investigation itself — trial pits, soil sampling, plasticity testing — is a relatively modest cost in the context of a new build. It’s the one piece of information that fixes the foundation depth, satisfies Building Control, and gives you and your builder confidence that what’s going into the ground is right for the ground it’s going into.

    Self-builders in particular sometimes try to skip this step, especially on smaller projects or single-storey extensions. I understand the instinct — it feels like an extra cost on top of everything else. But I’ve seen the consequences of skipping it, and the remedial work is always more expensive than the investigation would have been.

    When to call a structural engineer

    If you’re commissioning a new build or extension on clay ground, with trees anywhere near the footprint, you need a structural engineer involved before the foundation design is fixed — ideally before the geotechnical investigation is scoped, so the right tests are specified. You also need that engineer to translate the investigation results into a Building Control-ready foundation design with supporting calculations. Foundation depth near trees on clay soil is not a situation where a builder’s experience or a standard detail is sufficient. The ground investigation and the engineering design need to work together, and both need to be in your Building Control submission.


    Need expert eyes on your project?

    I am a Chartered Structural Engineer (CEng, MIStructE) based in Huddersfield. The Beam Doctor offers homeowners and builders:

    • Steel beam (RSJ) calculations — Eurocode-compliant, Building Control-ready, in 5 working days. See all services and current fees →
    • Defect investigation — I attend your property, inspect the cracking or movement, and give you a written opinion on the cause. The site visit is included in the price. See the fee bands →
    • Structural Engineer’s Report — a signed desk-based opinion on a single structural concern, for a mortgage lender or an insurance claim. Request a report →
    • On-site attendance — a Chartered Engineer at your property, tiered by duration. See site visit fees →

    Current fees for every service are listed on the services page.
  • Removing Your Chimney Breast: Why Party Wall and Temporary Support Matter

    Removing Your Chimney Breast: Why Party Wall and Temporary Support Matter

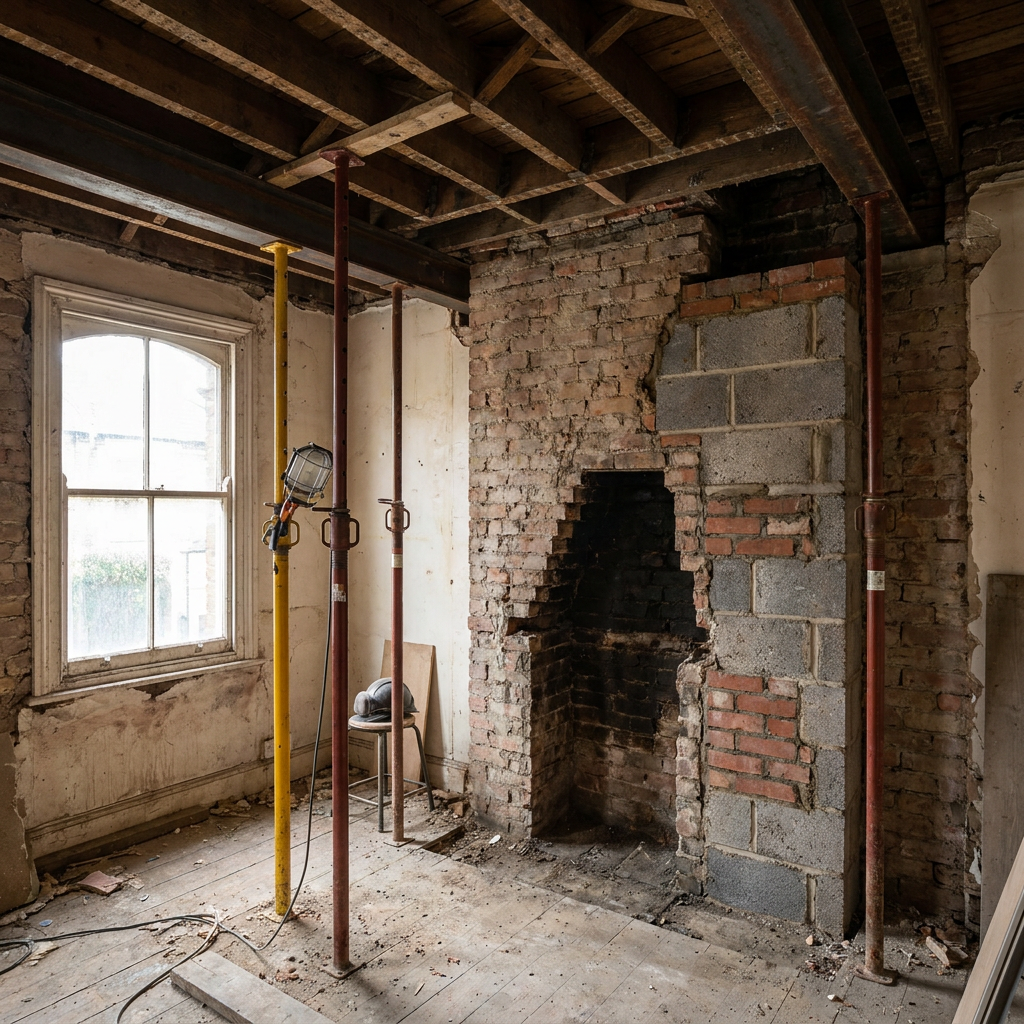
    Removing a chimney breast sounds straightforward enough — knock out the brickwork, fit a beam, job done. But on a semi-detached house, where the stack is shared with your neighbour and you’re planning to remove the breast on two floors at once, the structural picture becomes considerably more involved. I want to walk you through exactly what that looks like, because getting it wrong can leave a tonne of masonry with nowhere to go.

    Key Takeaways

    • Removing chimney breasts on two floors simultaneously requires two separate beams, each designed for a different load — and the first-floor beam carries the more critical one.
    • On a semi-detached property, the chimney stack is almost always shared. The Party Wall Act applies, and your neighbour must be served notice before any work starts.
    • Whether your neighbour has already removed their breast changes the loading calculation entirely — you need to establish that before calculations are finalised.
    • If both floors are being stripped in a single operation, the temporary propping sequence for the loft stack must be specified in writing before a contractor sets foot on site.
    • Chimney breast removal structural calculations need to be submitted to Building Control — this is notifiable work under Part A (Structure) of the Building Regulations.

    What’s actually happening structurally

    A chimney breast isn’t just decorative brickwork. It’s a load-bearing element carrying the weight of everything above it — the breast on the floor above, the stack in the loft, and the section of stack exposed above the roof line. When you remove the breast at ground floor level, you’re cutting out a structural column mid-height. Something has to pick up that load and transfer it to the foundations by a new route.

    On the job I’m currently working through — a semi-detached property in the Oldham area — the client is removing the chimney breast on both the ground floor and first floor. That means two beams, not one. The ground-floor beam spans roughly 1,000–1,100mm (based on the drawings provided) and carries the first-floor breast plus everything above. The first-floor beam carries the loft-level stack and, critically, the section of stack that remains exposed above the roof.

    That above-roof portion is the part that catches people out. It sits eccentrically — it doesn’t load straight down through the centre of the support. It bears onto whatever is carrying it in the loft, which in this case will likely be a steel or timber gallows bracket bearing onto the party wall and gable. Designing that detail correctly, accounting for the eccentric load and the lateral stability of the exposed stack, is where the real engineering sits.

    Why the first-floor beam is the critical one

    It might seem logical that the ground-floor beam does the heavier lifting, because it’s carrying more floors of structure above it. But in chimney breast removals, the first-floor beam often governs the design. Here’s why.

    The ground-floor beam spans across the opening left by the removed breast and bears onto the remaining wall on either side. It’s a relatively short span, and the loads, while significant, are well-defined. The first-floor beam, by contrast, has to carry the loft stack — which includes the full height of brickwork from ceiling level up to the ridge and beyond. That above-roof stack adds an eccentric, overturning component to the loft support detail that needs careful analysis.

    The gallows bracket or equivalent support in the loft doesn’t just carry vertical load. It resists the tendency of the stack to rock or lean, particularly if the stack is tall relative to its base. Wind load on the exposed stack also feeds into this. I won’t finalise the calculations until I have the exact height of the remaining loft stack and the above-roof height, but these are the numbers that will drive the design.

    The Party Wall dimension — and why it changes everything

    This is the piece that homeowners most often underestimate. On a semi-detached house, the chimney stack straddles the party wall. It belongs to both properties. That means the Party Wall etc. Act 1996 applies, and your neighbour must be served formal written notice before any structural work to the stack begins. This isn’t optional, and it isn’t just a courtesy — it’s a legal requirement.

    But the Party Wall Act isn’t just an administrative hurdle. It has a direct structural implication. If your neighbour’s chimney breast is still in place on their side, the load from the shared stack is distributed between both properties. If they’ve already removed their breast — which is increasingly common — the entire stack weight is now bearing on your side alone. That fundamentally changes the load I’m designing for.

    On this project, I’ve flagged to the client that establishing the neighbour’s status is essential before I finalise the calculations. If the neighbour’s breast is gone, the numbers go up. A party wall surveyor appointment should run in parallel with the structural design process, not after it. The two workstreams need to talk to each other.

    Information I need before calculations can begin

    This is a project at quoting stage — no contractor is appointed yet — so I’m working from drawings and initial information. Before I can produce Building Control-ready calculations, I need the following confirmed:

    • Floor-to-ceiling heights at ground floor and first floor
    • Chimney breast wall thickness and construction (brick or blockwork, and which bond)
    • Party wall thickness and the neighbour’s breast status
    • Floor joist direction on both floors — this affects how the trimming detail around the breast opening is designed
    • Height of the remaining stack in the loft, and the above-roof height to the top of the pots

    It’s worth noting that floor joist direction matters more than people expect. If the joists run parallel to the chimney breast rather than into it, the trimming arrangement changes. You may need a trimmer joist and trimming joist to redistribute load around the opening, and the bearing details need to be designed accordingly. I can’t assume the joist direction from a plan alone on older housing stock.

    The temporary propping sequence — a red flag worth taking seriously

    Here’s the scenario I want to avoid: a contractor arrives on site and decides to crack on with both floors in a single operation. They strip the ground-floor breast, then immediately move upstairs and strip the first-floor breast before the ground-floor beam is installed and properly bearing. For a brief period, the loft stack has no support path to the foundations. That’s not a theoretical risk — it’s a real one, and it can cause the stack to move or drop without warning.

    The temporary propping sequence must be specified in the structural engineer’s drawings and notes before work starts. Typically this means Acrow props and temporary needles installed to carry the loft stack before any permanent brickwork is disturbed, with a defined sequence for installing each beam and achieving full bearing before the props are struck. The contractor should not be left to improvise this on site.

    If you’re getting quotes and a contractor doesn’t mention propping sequence, ask them directly how they intend to support the loft stack during the works. Their answer will tell you a lot about their experience with this type of job.

    Building Control and the calculations package

    Chimney breast removal on a load-bearing stack is notifiable work. You need to submit structural calculations to Building Control under Part A (Structure) of the Building Regulations — Approved Document A sets out the framework. The calculations package for a two-floor removal like this will cover both beams, the padstone design at each bearing, the loft gallows bracket or equivalent, and the trimming details around the floor openings.

    Getting this submitted before the contractor starts means the inspector can check the design, and your contractor has a document to work from. It also protects you if you ever sell — a buyer’s solicitor will ask for evidence that structural alterations were done with consent, and a Building Control completion certificate is the document that provides it.

    When to call a structural engineer

    Any chimney breast removal on a semi-detached or terraced house — where the stack is shared — needs a structural engineer involved from the start. If you’re removing on more than one floor, if the stack above the roof is tall, or if you have any reason to think the neighbour’s breast may already be gone, the complexity increases further. Don’t wait until a contractor asks you for calculations. Appoint the engineer early, let the structural and party wall workstreams run in parallel, and make sure the propping sequence is written into the specification before anyone picks up a hammer.


    Need expert eyes on your project?

    I am a Chartered Structural Engineer (CEng, MIStructE) based in Huddersfield. The Beam Doctor offers homeowners and builders:

    • Steel beam (RSJ) calculations — Eurocode-compliant, Building Control-ready, in 5 working days. See all services and current fees →
    • Defect investigation — I attend your property, inspect the cracking or movement, and give you a written opinion on the cause. The site visit is included in the price. See the fee bands →
    • Structural Engineer’s Report — a signed desk-based opinion on a single structural concern, for a mortgage lender or an insurance claim. Request a report →
    • On-site attendance — a Chartered Engineer at your property, tiered by duration. See site visit fees →

    Current fees for every service are listed on the services page.
  • Why Your Bay Window Is Sinking and How to Fix It

    Why Your Bay Window Is Sinking and How to Fix It

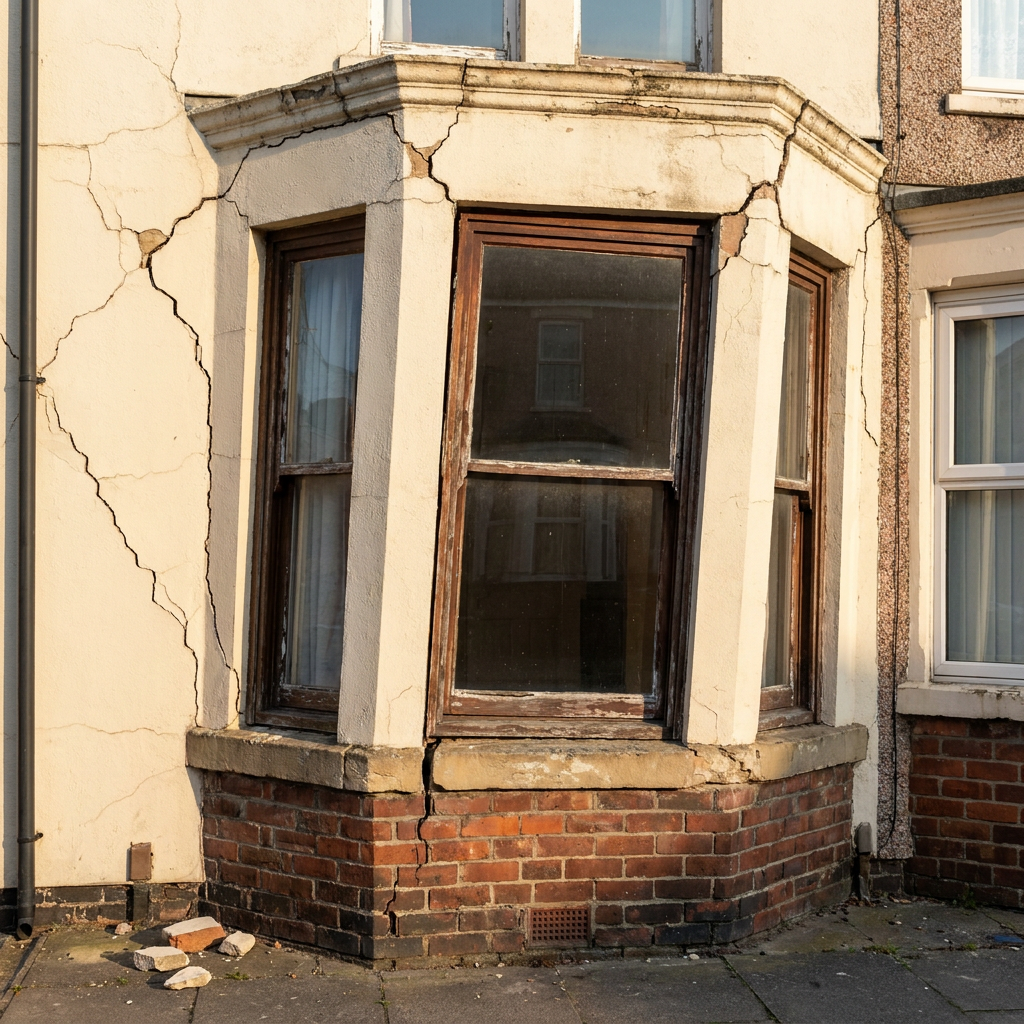
    You’ve noticed the top of your bay window has started to dip, perhaps the brickwork above is cracking, or the window frame itself has begun to rack out of square. It’s unsettling, but it’s also more common than you might think — and in most cases, it’s entirely fixable once you understand what’s actually going on structurally.

    Key Takeaways

    • A dropping bay window lintel is often caused by an undersized or overloaded timber lintel that was never designed for the loads now acting on it.
    • Loft conversions and other alterations can redirect loads onto elements that weren’t originally intended to carry them.
    • Even small deflections — as little as 3mm — can be significant and warrant a proper structural assessment.
    • The typical fix involves replacing the failed lintel with a correctly sized steel RSJ, properly bedded on padstones at each bearing.
    • This type of remedial work requires Building Control notification and, in most cases, structural calculations.

    What I Found on a Recent Job

    I was called to a 1960s semi-detached property in West Yorkshire where the homeowner had noticed the brickwork above the front bay window beginning to crack and the lintel visibly dropping. When I measured it up on site, the lintel had deflected by 3mm — which doesn’t sound like much, but in a relatively short span over a bay window, that’s enough to tell you something has gone wrong with the load path.

    The property had undergone a loft conversion at some point in the past. That work had introduced additional loading from the masonry above the bay — essentially, the weight of the gable and roof structure was now bearing down through a load path that hadn’t existed, or hadn’t been properly accounted for, when the original lintel was installed. The existing lintel was a timber section, typical of 1960s construction, and it simply wasn’t designed to carry that kind of load. It was doing its best, but it was losing the battle.

    This is a situation I see with some regularity. A loft conversion is completed — sometimes with Building Control approval, sometimes without — and years later the consequences show up at a completely different part of the structure. The bay window lintel, sitting quietly at the front of the house, ends up carrying loads it was never intended to see.

    Why 1960s Timber Lintels Are Particularly Vulnerable

    Houses built in the 1950s and 1960s were typically constructed with brick outer leaves and timber inner frames or loadbearing masonry inner leaves. Lintels over openings — including bay windows — were often timber, sized to carry the original design loads and nothing more. There was no spare capacity built in for future alterations.

    Timber lintels in this era were also frequently installed without the kind of bearing lengths and padstone arrangements we’d specify today. They sat directly on the brickwork, which is fine under modest loads, but once you start adding load — from a loft conversion, a heavy masonry parapet, or even cumulative moisture damage to the timber — the margin disappears quickly.

    The other issue with timber is that it creeps under sustained load. Unlike steel, which will hold its position until it reaches yield, timber deflects slowly over time. A 3mm drop measured today might have taken ten years to develop, which is why homeowners often don’t notice until the cracking above the window becomes impossible to ignore.

    The Structural Fix: Steel RSJ and Padstones

    For the property I visited, my recommendation was to replace the failed timber lintel with a 150×90×8 mild-steel RSJ. The section size was chosen to carry the actual loads now acting on it — including the additional masonry load introduced by the loft conversion — with appropriate deflection limits applied.

    Steel is the right material here for several reasons. It doesn’t creep, it can be accurately sized to the load, and it can be fabricated to the exact span required. A properly specified RSJ over a bay window, installed correctly, should last the life of the building without further movement.

    Equally important are the padstones at each bearing. I specified a minimum 215×215×100mm padstone at each end. Padstones exist to spread the concentrated point load from the end of the beam over a larger area of masonry, preventing local crushing of the brickwork. Skimping on padstones — or omitting them entirely, as I’ve seen done — transfers all that load into a very small area of brick and mortar, which will fail in time. The padstone size I specified here reflects the bearing loads calculated for this particular beam and span.

    Before any of this work begins, a proper propping plan is essential. The masonry above the existing lintel needs to be supported on Acrow props and temporary needles before the old lintel is removed. This isn’t optional — removing a lintel without propping risks the immediate collapse of the masonry above, which is both dangerous and significantly more expensive to repair than the original problem.

    The Role of the Loft Conversion

    It’s worth pausing on the loft conversion angle, because it illustrates something important about how structural alterations can have consequences elsewhere in a building.

    When a loft conversion is designed properly, the engineer or designer will trace every new load through the structure down to the foundations. New steelwork, new purlins, new hanger loads — all of it gets followed through. But sometimes, particularly in older permitted development loft conversions or those done without full structural input, the load paths don’t get fully traced. The masonry above a bay window might not look like part of the loft structure, but if the conversion has altered the roof geometry or introduced new loads into the gable, that masonry can end up carrying significantly more than it did before.

    In this case, the loft conversion above had effectively made the masonry over the bay part of a new loading path that the original timber lintel was never designed to handle. It’s a reminder that structural alterations rarely affect only the area where the work is physically carried out.

    Building Control and Remedial Work

    Replacing a structural lintel — even as a remedial repair — is notifiable work under Part A (Structure) of the Building Regulations. You’ll need to submit a Building Notice or a Full Plans application to your local authority Building Control, or use an Approved Inspector. The work will need to be inspected, and you’ll need signed structural calculations to support the beam specification.

    I should be clear that this particular job was a remedial fix after the fact, not a new build or an extension, so certain warranty frameworks didn’t apply. But the Building Regulations obligation remains regardless. A homeowner who skips Building Control on this kind of repair will find it flagged immediately on any future sale, and may struggle to get the work signed off retrospectively.

    If you’re buying a property and the vendor mentions a previous loft conversion, it’s always worth asking whether the structural drawings included an assessment of the bay window lintel and other elements below. If they can’t produce them, that’s a reason to commission a structural engineer’s assessment before you exchange.

    When to Call a Structural Engineer

    If you can see cracking above your bay window, if the window frame is racking or sticking, or if you can measure any visible drop in the lintel or the brickwork above it, you need a structural engineer involved before you instruct a builder. A dropped bay window lintel repair is not a job where you want to be working from a builder’s best guess about what beam to use. The consequences of getting it wrong — partial collapse of the masonry, further movement, failed Building Control sign-off — are far more costly than the fee for proper calculations and a specification. Get the engineering done first, then let your builder price the work from a clear scope.


    Need expert eyes on your project?

    I am a Chartered Structural Engineer (CEng, MIStructE) based in Huddersfield. The Beam Doctor offers homeowners and builders:

    • Steel beam (RSJ) calculations — Eurocode-compliant, Building Control-ready, in 5 working days. See all services and current fees →
    • Defect investigation — I attend your property, inspect the cracking or movement, and give you a written opinion on the cause. The site visit is included in the price. See the fee bands →
    • Structural Engineer’s Report — a signed desk-based opinion on a single structural concern, for a mortgage lender or an insurance claim. Request a report →
    • On-site attendance — a Chartered Engineer at your property, tiered by duration. See site visit fees →

    Current fees for every service are listed on the services page.

  • Vertical Cracks at the Corners of Your Internal Walls: Cosmetic or Structural?

    Vertical Cracks at the Corners of Your Internal Walls: Cosmetic or Structural?

    You’ve noticed vertical cracks running down the corners of your internal walls — perhaps worse upstairs than down, and wider near the ceiling than the floor. It’s easy to jump straight to the word “subsidence,” but in my experience these particular cracks usually have a far more straightforward explanation. Let me walk you through what I found on a real job, and what it means for your home.

    Key Takeaways

    • Vertical cracks at internal corners of cavity-wall homes built around 2000 are usually caused by thermal and moisture movement of the aircrete inner leaf — not subsidence.
    • The inner leaf is the load-bearing skin, so while this cracking is normally cosmetic, you should have an engineer confirm that before assuming the worst is over.
    • Red flags that change the picture: matching cracks in the outer brickwork, diagonal or tapering cracks, sticking doors or windows, cracks wider than 5 mm, or cracks that keep growing.
    • The standard repair is crack-stitching with stainless helical bars and forming a proper movement joint near the corner — no underpinning required for this mechanism.
    • Retrofitted cavity insulation and mortar voids in the bed joints can make the movement worse by amplifying internal temperature swings over the years.

    The House I Was Called To

    The property was a detached house built around 2000 — traditional cavity wall construction: 102 mm clay brick outer leaf, roughly 50 mm cavity, and a 100 mm aircrete (aerated concrete) blockwork inner leaf. Cavity insulation had been retrofitted at some point after the original build. The homeowner’s concern was exactly what you might be experiencing: vertical cracks at the internal corners only, noticeably worse at first-floor level than ground floor, and wider near the ceiling, tapering down towards the skirting.

    Critically, there was no cracking visible in the external brickwork at all. That single observation already told me a great deal. If this were foundation movement — subsidence or heave — you would almost certainly expect to see corresponding distress in the outer leaf, diagonal cracking, and likely some misalignment at window or door openings. None of that was present here. The problem was confined entirely to the inner leaf, and it had a mechanical explanation.

    Why Aircrete Blocks Crack at Corners

    Aircrete blockwork moves — it shrinks as it dries after laying, and it expands and contracts with temperature changes throughout its life. Clay brickwork also moves, but in the opposite direction: clay bricks tend to expand over time, particularly on a warm south-facing elevation. These two materials sit side by side in a cavity wall, connected by wall ties, and they respond to heat and moisture differently.

    In this house, the inner leaf had never been provided with movement joints. Industry guidance — including NHBC Technical Standards guidance 6.1/28 — recommends movement joints in concrete and aircrete blockwork at roughly 6 m centres, and at no more than approximately half that distance from a corner. For clay brick outer leaves the spacing is wider, around 10–12 m. These are guidance figures, not Building Regulation requirements, but they exist for good reason.

    Without those joints, movement has nowhere to go. The corner is a restraint point — the wall is held in two directions — so that’s where the stress concentrates and the block eventually cracks. The crack opens wider at the top because the cumulative movement is greatest there; the lower storeys are more restrained by the floor structure and the weight above them.

    Two additional factors made things worse in this particular house. First, the cavity insulation had been absent for years before it was retrofitted, meaning the inner leaf had experienced large swings in internal temperature — accelerating the movement cycle. Second, there was evidence that the mortar in the bed joints had voids, possibly because the blocks were laid in wet weather and the mortar hadn’t cured uniformly. When the blocks subsequently dried and shrank, the weakened joints offered less resistance.

    Is It Structural? The Honest Answer

    Here is where I want to be direct with you, because this is the question that matters most. Thermal and moisture movement cracking of the aircrete inner leaf is, in the vast majority of cases, a cosmetic defect — it does not represent a structural-safety failure of the building.

    However — and this is important — the inner leaf of a cavity wall is the load-bearing skin. It carries the floor joists, the roof loads, and the weight of everything above. So while the mechanism I’ve described is benign, you cannot simply assume that without an engineer looking at it. The cracks I examined on this job were consistent with movement cracking and nothing more. But I was there in person to rule out the other possibilities.

    The red flags that would change my assessment entirely are: cracking that also appears in the outer brickwork; diagonal cracks rather than clean vertical ones; cracks that taper in an irregular way suggesting differential settlement; doors or windows that have started sticking or binding; any individual crack wider than approximately 5 mm; or cracks that you can observe widening over weeks or months. If any of those apply to your situation, the picture is different and you need professional input promptly.

    For the house I visited, none of those red flags were present. The vertical cracks at the corners of your internal walls, in isolation, are telling you about movement — not about the foundations.

    The Repair: What Actually Works

    There is no need for underpinning with this mechanism. Underpinning addresses foundation movement; it would do nothing for thermal and moisture movement in the blockwork above. The correct repair has two components.

    First, crack-stitching. Stainless steel helical bars are bedded in resin or grout into raked-out bed joints at approximately 450 mm vertical centres, spanning across the crack. This reinstates the tensile continuity of the blockwork across the damaged zone without being rigid — the bars have some flexibility. The joints are then filled flush and made good.

    Second, and equally important, a proper movement joint needs to be formed near the corner. A compressible filler material is inserted into a formed vertical joint, sealed with a flexible sealant or fitted with an expansion bead. This gives the blockwork somewhere to accommodate future movement, so the same cracking doesn’t recur. Without this second step, you’re repairing the symptom without addressing the cause.

    Once both elements are in place, the wall can be made good and redecorated in the normal way. This is competent building contractor work once an engineer has specified it correctly.

    What About the Cavity Insulation?

    The retrofitted cavity insulation in this house is worth a brief mention. Cavity insulation does reduce the temperature differential across the inner leaf, which in principle reduces the amplitude of thermal movement going forward. So its presence now is not a bad thing. But if the insulation was installed poorly — with gaps, or if the original installation disturbed the mortar in the bed joints — it can create localised cold bridges or moisture pathways that introduce their own problems. It’s worth having the installation checked if you have any doubts, particularly if you’re seeing damp patches as well as cracking.

    The key point is that the years before insulation was installed are likely when most of the cumulative movement occurred. The cracking you’re seeing now is often the legacy of those earlier cycles, not necessarily evidence that the movement is still actively progressing at the same rate.

    When to Call a Structural Engineer

    Call a structural engineer if the cracks are wider than 5 mm, if you can see matching distress in the external brickwork, if doors or windows are sticking, or if the cracks appear to be actively widening. You should also get professional input before instructing any repair contractor — crack-stitching and movement joint formation need to be specified correctly for the repair to hold. If you’re buying or selling a property with vertical cracks in internal walls and the vendor or surveyor can’t give a clear explanation, a structural engineer’s report will give you and your solicitor the clarity you need.


    Need expert eyes on your project?

    I am a Chartered Structural Engineer (CEng, MIStructE) based in Huddersfield. The Beam Doctor offers homeowners and builders:

    • Steel beam (RSJ) calculations — Eurocode-compliant, Building Control-ready, in 5 working days. See all services and current fees →
    • Defect investigation — I attend your property, inspect the cracking or movement, and give you a written opinion on the cause. The site visit is included in the price. See the fee bands →
    • Structural Engineer’s Report — a signed desk-based opinion on a single structural concern, for a mortgage lender or an insurance claim. Request a report →
    • On-site attendance — a Chartered Engineer at your property, tiered by duration. See site visit fees →

    Current fees for every service are listed on the services page.

  • Why a Structural Engineer Visit is Crucial After a Level 3 Survey

    Why a Structural Engineer Visit is Crucial After a Level 3 Survey

    You’ve just received your Level 3 survey report, and somewhere in the middle of all that technical language there’s a recommendation that stops you in your tracks: “a structural engineer should inspect this further.” If you’re a first-time buyer, that sentence can feel alarming — but it doesn’t have to be.

    Key Takeaways

    • A Level 3 survey recommendation for a structural engineer visit is common and doesn’t automatically mean the property is unsound.
    • A structural engineer assesses specific defects in detail — going beyond what a surveyor is qualified to advise on.
    • The visit produces a formal report that gives you, your solicitor, and your mortgage lender reliable technical evidence.
    • Findings can inform your purchase price negotiation or clarify what remedial work is actually needed.
    • Getting this done before exchange protects you from inheriting problems you didn’t fully understand.

    What a Level 3 Survey Actually Tells You

    A Level 3 survey — formerly called a Full Building Survey — is the most thorough inspection a chartered surveyor carries out. It covers the condition of every accessible element of the property: roof structure, walls, floors, drainage, joinery, and more. Your surveyor will flag defects using a traffic-light system, with Category 3 items requiring urgent attention and Category 2 items needing repair but not immediately critical.

    What a Level 3 survey doesn’t do is tell you why a structural defect has occurred, how serious it actually is from an engineering standpoint, or what the correct fix looks like. Surveyors are trained to identify and report; structural engineers are trained to analyse, calculate, and specify solutions. The two roles complement each other — they don’t overlap.

    So when your surveyor writes something like “cracking to the rear flank wall — structural engineer’s opinion recommended,” they’re being responsible. They’ve spotted something outside their scope to fully assess. That referral is a sign of professional integrity, not a cause for panic.

    Common Reasons a Level 3 Survey Flags a Structural Engineer Visit

    In my experience working with homeowners across West Yorkshire, the most frequent triggers for a structural engineer referral after a Level 3 survey fall into a handful of categories.

    Cracking and movement

    Diagonal cracking at window and door openings, stepped cracking through brickwork, or cracks wider than about 5 mm are all things a surveyor will flag for further investigation. The cause could be anything from minor thermal movement to subsidence or a failing lintel — and only a structural assessment can tell you which.

    Suspected wall removal or alterations

    If the surveyor suspects a wall has been removed without proper structural support — or that an existing beam or lintel looks undersized — they’ll want an engineer to check it. This is especially relevant in older terraced and semi-detached homes in Yorkshire where DIY alterations have been carried out over decades without Building Control sign-off.

    Roof structure concerns

    Cut roofs (where rafters are individually shaped on site) can deteriorate or be compromised by loft conversions done without proper structural input. Spread at the eaves, sagging ridges, or missing purlins all warrant a closer look.

    Foundation and subsidence indicators

    Sloping floors, doors and windows sticking, or a history of insurance claims can all point to foundation movement. A structural engineer can assess whether movement is historic and stable, or ongoing and progressive.

    What Happens During the Structural Engineer Visit

    When I carry out a structural engineer visit following a Level 3 survey, I arrive with the surveyor’s report in hand. I want to understand exactly what triggered the referral before I even walk through the door. That context helps me focus the inspection efficiently.

    On site, I’ll examine the specific defects the surveyor flagged, but I’ll also look at the broader picture. Structural problems rarely exist in isolation. A cracked wall might be connected to what’s happening at foundation level, or to an alteration carried out elsewhere in the house.

    I’ll check:

    • The nature, pattern, and width of any cracking
    • Whether walls are plumb and floors are level (using a spirit level and sometimes a surveying level for more precise readings)
    • The condition and adequacy of any beams, lintels, or padstones visible
    • Evidence of previous repairs or alterations
    • The roof structure, where accessible via the loft hatch
    • Any signs of damp that might be affecting structural elements

    I’ll take photographs throughout and make notes that feed directly into my written report. The whole visit typically takes one to two hours depending on the size of the property and the number of issues to assess.

    The Structural Engineer’s Report — What You’ll Receive

    After the visit, I produce a written structural report. This is a formal professional document, not a brief email. It sets out my findings, my assessment of the cause and severity of each defect, and my recommendations for remedial action — or, in many cases, confirmation that no action is needed beyond monitoring.

    That last point is worth emphasising. A structural engineer visit doesn’t always result in bad news. In a significant number of cases I attend, the defects flagged by the surveyor turn out to be minor, historic, or cosmetic in nature. Having that confirmed in writing by a Chartered Structural Engineer gives you — and your mortgage lender — the reassurance needed to proceed with confidence.

    Where remedial work is required, my report will describe what needs to be done. This might be repointing, installing a new lintel, underpinning, or something more involved. That specification is what you need to get contractor quotes, and it’s what Building Control will want to see if the work requires a structural design.

    Your solicitor can also use the report in pre-exchange negotiations. If the property needs £8,000 of structural remediation, that’s a legitimate basis for renegotiating the purchase price — but only if you have a credible professional document to back it up.

    Timing — When to Commission the Visit

    The short answer: as soon as possible after receiving the Level 3 survey report, and certainly before exchange of contracts.

    Once you exchange, you’re legally committed. Any structural surprises after that point are your problem to solve at your own cost. Getting a structural engineer visit done during the conveyancing period — when you still have the option to renegotiate or withdraw — is the only position that genuinely protects you.

    I’d also recommend not waiting to see if the seller will commission their own report. Sellers have an obvious interest in a favourable outcome. Your structural engineer works for you, reports to you, and carries professional indemnity insurance that protects you if the advice turns out to be wrong. That independence matters.

    Practically speaking, most conveyancing processes allow enough time for a structural visit and report between the Level 3 survey and exchange. If your solicitor is pushing for a fast exchange, tell them you need the structural report first. A good solicitor will support that position.

    What a Structural Visit Costs — and Why It’s Worth It

    A structural engineer site visit for a residential property in West Yorkshire typically costs a few hundred pounds. Set that against the purchase price of the property — and the potential cost of undetected structural problems — and it’s straightforward value.

    Think about it this way. If the visit confirms everything is fine, you’ve bought peace of mind and a professional document you can show your lender. If it uncovers something significant, you’ve potentially saved yourself from a very expensive mistake, or at least given yourself the information to renegotiate properly.

    First-time buyers sometimes hesitate because they’ve already spent money on solicitors, surveys, and mortgage arrangement fees. I understand that. But structural issues are among the most costly things to fix in a property. This is not the area to cut corners.

    When to Call a Structural Engineer

    If your Level 3 survey has flagged anything related to cracking, movement, suspected alterations, roof structure, or foundations, you need a structural engineer’s input before you exchange contracts — full stop. The same applies if you’re already in a property and you’ve noticed new cracking, doors and windows that have started sticking, or floors that feel noticeably uneven. A structural engineer visit gives you clarity, a formal record, and the professional guidance to make informed decisions. Don’t rely on a builder’s opinion for structural matters; get someone who is chartered, carries professional indemnity insurance, and can produce a report that carries genuine weight.


    Need expert eyes on your project?

    I’m Paul Kangunga, a Chartered Structural Engineer (CEng, MIStructE) based in Huddersfield. The Beam Doctor offers homeowners and builders:

    • Steel beam (RSJ) calculations — Eurocode-compliant, Building Control-ready, in 5 working days. See all services and current fees →
    • Defect investigation — I attend your property, inspect the cracking or movement, and give you a written opinion on the cause. The site visit is included in the price. See the fee bands →
    • Structural Engineer’s Report — a signed desk-based opinion on a single structural concern, for a mortgage lender or an insurance claim. Request a report →
    • On-site attendance — a Chartered Engineer at your property, tiered by duration. See site visit fees →
  • Moving a Wall Planning Permission: What UK Homeowners Need to Know

    Moving a Wall Planning Permission: What UK Homeowners Need to Know

    You’ve decided to open up your ground floor, knock through a doorway, or shift a partition wall to make better use of your space — and now you’re wondering whether you need planning permission before you pick up a sledgehammer. It’s one of the most common questions I hear from homeowners across West Yorkshire, and the answer is more nuanced than a simple yes or no.

    Key Takeaways

    • Moving a non-load-bearing internal wall does not usually require planning permission under permitted development rights.
    • Building Regulations approval may still be required, depending on the scope of the work.
    • You must confirm a wall is truly non-load-bearing before any work begins — assumptions can be costly and dangerous.
    • Listed buildings and properties in conservation areas have stricter rules that can override permitted development rights.
    • A structural engineer’s assessment gives you certainty and protects you legally when you come to sell the property.

    Planning Permission vs Building Regulations: Understanding the Difference

    These two things get confused constantly, and it’s easy to see why — both involve official approval, both can feel like bureaucratic hurdles, and both can delay your project if you get them wrong. But they are entirely separate processes with different purposes.

    Planning permission is about how a building looks from the outside and how it affects the surrounding area. It controls things like extensions, new windows on a front elevation, changes of use, and outbuildings. Internal alterations — including moving a partition wall — almost never fall within the scope of planning permission. The planning system simply isn’t concerned with what happens inside your home, provided the external appearance doesn’t change.

    Building Regulations, on the other hand, are about safety and structural integrity. They’re administered locally by Building Control — either through your local authority or an approved inspector — and they govern how work is carried out, not just whether it can be done. This is where internal wall removal and relocation can absolutely trigger a requirement for formal approval.

    So if someone tells you that moving a non-load-bearing wall requires planning permission, they’re almost certainly conflating the two. What they probably mean — and what you genuinely need to think about — is Building Regulations compliance.

    When Does Moving a Non-Load-Bearing Wall Require Building Regulations Approval?

    The short answer is: it depends on what else is affected by the work. Moving a simple stud partition wall in isolation, where no structural elements, electrical circuits, heating pipework, or fire-compartmentation is disturbed, may fall within the scope of minor works that don’t require a formal Building Regulations application. However, in practice, very few wall removals are that straightforward.

    Here are the situations where Building Regulations approval is likely to be required:

    • Electrical alterations — if the wall contains sockets, switches, or lighting circuits, any rewiring must comply with Part P of the Building Regulations.
    • Fire compartmentation — in houses of multiple occupation (HMOs) or where a wall forms part of a fire-separation barrier, removing or moving it affects your Part B obligations.
    • Structural implications — if there’s any doubt about load-bearing status, or if the work involves removing a section of wall that supports another element, Part A of the Building Regulations applies.
    • Thermal envelope changes — less common for internal walls, but relevant if the wall separates a heated from an unheated space.

    My advice is always to notify Building Control regardless. A completion certificate creates a paper trail that protects you at the point of sale and confirms the work was done properly. Trying to sell a house where undocumented structural work has taken place can cause real problems during conveyancing.

    How Do You Know If a Wall Is Actually Non-Load-Bearing?

    This is where I have to be direct with you: do not assume. I’ve seen homeowners remove walls they were certain were non-load-bearing, only to discover the hard way that they were wrong. The consequences range from cracked ceilings to partial roof collapse — and that’s not an exaggeration.

    There are some general indicators that a wall might be non-load-bearing. Partition walls running parallel to floor joists, thin stud walls with no foundation beneath them, and walls added during a later conversion are often non-structural. But none of these are definitive. A wall can run parallel to joists and still carry load from above. A stud wall can be structural if it was built to support a specific element.

    The only reliable way to confirm load-bearing status is to have a structural engineer carry out an assessment. This involves looking at the construction type, the direction of the floor and roof structure, what sits above the wall on each storey, and whether any load path runs through or near the wall in question. It’s not always a complex piece of work, but it requires professional judgement and an understanding of how the whole building behaves — not just the wall in isolation.

    Approved Document A, which supports Part A of the Building Regulations, sets out the structural performance requirements that all residential buildings must meet. Any alteration that could affect structural stability needs to be considered against those requirements.

    Listed Buildings and Conservation Areas: Different Rules Apply

    If your property is a listed building, the rules change significantly. Listed building consent is required for any works that affect the character of a listed building — and that includes internal alterations. Moving a partition wall, even a clearly non-structural one, can require listed building consent if that wall is considered to contribute to the historic fabric or character of the building.

    This isn’t just a technicality. Carrying out works to a listed building without consent is a criminal offence, and the local planning authority can require you to reinstate what was removed — at your cost. If you own a listed property, always contact your local planning authority before any internal work begins, however minor it seems.

    Conservation area designation, by contrast, primarily affects external alterations. Moving an internal wall in a house within a conservation area doesn’t usually require planning permission purely because of the conservation area status. However, if the work involves any external changes — a new opening, altered roofline, or changed fenestration — then the conservation area rules do come into play.

    When in doubt, a quick pre-application enquiry to your local planning authority costs very little and gives you clarity before you commit to anything.

    What About Party Walls?

    If the wall you’re planning to move is a party wall — meaning it’s shared with a neighbouring property — then the Party Wall etc. Act 1996 applies. This is separate from both planning permission and Building Regulations, and it’s a legal requirement, not a courtesy.

    Under the Act, you must serve written notice on your adjoining owner before carrying out certain works to a party wall. Moving or removing a party wall entirely falls squarely within the Act’s scope. Your neighbour has the right to appoint a party wall surveyor, and in some cases a party wall award must be agreed before work can begin.

    Non-load-bearing party walls are still party walls. The structural classification of the wall doesn’t change your obligations under the Act. If there’s any possibility the wall you’re moving is shared with a neighbour, take legal advice or speak to a party wall surveyor before you proceed.

    Failing to serve notice can lead to injunctions, delays, and significant legal costs — none of which you want when you’re trying to open up a living room.

    The Practical Process: What to Do Before Work Starts

    Here’s a straightforward sequence I’d recommend to any homeowner planning to move an internal wall:

    • Step 1 — Get a structural assessment. Have a structural engineer confirm whether the wall is load-bearing and whether any adjacent elements are affected. This is the most important step.
    • Step 2 — Check listed building status. Look up your property on the Historic England listed buildings register. If it’s listed, contact your local planning authority before anything else.
    • Step 3 — Identify party walls. If the wall is shared or adjacent to a neighbour’s property, take advice on your obligations under the Party Wall Act.
    • Step 4 — Notify Building Control. Submit a Building Regulations application or use the building notice procedure. Your structural engineer can advise on which route suits your project.
    • Step 5 — Appoint a competent contractor. Ensure whoever carries out the work understands the approved scope and will not deviate from it without consulting you and your engineer.

    This process protects you, your home, and anyone who lives in it. It also protects your investment — undocumented structural work is one of the most common issues flagged during property surveys.

    When to Call a Structural Engineer

    You should call a structural engineer before any wall removal or relocation work begins — not after a problem appears. If you have any uncertainty about whether a wall is load-bearing, if the wall runs through more than one storey, if you’re in a converted property where the original structure has been altered, or if your builder isn’t certain what they’re dealing with, professional input is essential. A structural assessment at the outset is far less expensive than remedial work, and it gives you the documentation you need for Building Control sign-off and future property sales.


    Need expert eyes on your project?

    I’m Paul Kangunga, a Chartered Structural Engineer (CEng, MIStructE) based in Huddersfield. The Beam Doctor offers homeowners and builders:

    • Steel beam (RSJ) calculations — Eurocode-compliant, Building Control-ready, in 5 working days. See all services and current fees →
    • Defect investigation — I attend your property, inspect the cracking or movement, and give you a written opinion on the cause. The site visit is included in the price. See the fee bands →
    • Structural Engineer’s Report — a signed desk-based opinion on a single structural concern, for a mortgage lender or an insurance claim. Request a report →
    • On-site attendance — a Chartered Engineer at your property, tiered by duration. See site visit fees →
  • Understanding Vertical Cracks in 1970s Homes: Expert Advice

    Understanding Vertical Cracks in 1970s Homes: Expert Advice

    You’ve viewed a 1970s house and spotted vertical cracks in the walls — and now you’re not sure whether to walk away or carry on with the purchase. I see this situation regularly, and the good news is that vertical cracks in older homes are often far less serious than they look.

    Key Takeaways

    • Vertical cracks in 1970s homes are common and frequently caused by normal thermal movement or shrinkage rather than structural failure.
    • The location, width, pattern, and whether a crack is live or dormant all matter more than the crack’s appearance alone.
    • 1970s construction methods and materials have specific characteristics that make certain crack types more likely.
    • Building Control and a structural engineer are your two key sources of professional guidance when cracks raise genuine concern.
    • Most vertical cracks can be monitored, repaired, or managed — they rarely mean a house is unsafe to buy.

    Why 1970s Homes Crack in the First Place

    Houses built in the 1970s are now over 50 years old. That’s half a century of seasonal temperature swings, ground movement, and gradual material deterioration. It’s entirely normal for a building of that age to show some cracking — the question is always what type of cracking, and what’s causing it.

    1970s UK housing was built predominantly with cavity wall construction using clay brickwork or concrete block inner leaves. Concrete blocks in particular are prone to shrinkage cracking as they cure and dry out over decades. This process can produce fine vertical cracks that look alarming but are structurally inconsequential.

    Many homes from this era also used lightweight aerated concrete blocks (sometimes called aircrete or Thermalite) for the inner leaf. These blocks have a higher moisture movement than dense concrete, meaning they expand and contract more noticeably with changes in humidity. Over 50 years, that repeated movement can open up fine vertical cracks at mortar joints or through block faces.

    Additionally, 1970s homes were often built on relatively shallow strip foundations. In areas with clay-rich soils — common across much of Yorkshire — seasonal ground movement (heave and shrinkage) can cause the structure above to move slightly. This movement often manifests as vertical or near-vertical cracking, particularly at corners and around window and door openings.

    Reading the Crack: What to Look For

    Not all vertical cracks are equal. When I assess a crack, I’m looking at several factors simultaneously before drawing any conclusions.

    Width and depth

    A hairline crack (under 0.1 mm) is almost always cosmetic. A crack between 0.1 mm and 1 mm is minor and usually requires only cosmetic repair. Once you’re looking at cracks wider than 5 mm, that warrants closer attention — though even then, width alone doesn’t tell the whole story.

    Pattern and location

    Vertical cracks that run straight up through mortar joints are often a sign of differential settlement or thermal movement. Cracks that step diagonally through mortar joints in a staircase pattern are more typical of differential settlement. True vertical cracks that cut straight through bricks (rather than following the mortar) suggest a more significant force was at work.

    Pay particular attention to cracks near the corners of buildings, around window and door frames, and at the junction between an extension and the original structure. These are classic stress concentration points.

    Live versus dormant

    A dormant crack has stabilised and isn’t moving. A live crack is still opening or closing. You can’t tell this from a single viewing — which is one reason I always recommend monitoring before panicking. A simple tell-tale gauge or even a pencil mark across the crack with a date will show you whether it’s moving over weeks or months.

    Common Causes of Vertical Cracks in 1970s Houses

    Thermal and moisture movement

    This is the most common cause I encounter. Brick and block expand in summer heat and contract in winter cold. Over 50 years, this repeated cycle can open up fine vertical cracks — particularly at movement joints (or where movement joints should have been but weren’t installed). 1970s building practice wasn’t always consistent about incorporating movement joints in long runs of brickwork, so cracks sometimes appear where a joint was omitted.

    Shrinkage of concrete blocks

    As I mentioned above, concrete blocks shrink as they dry out. In a 1970s home, this process should be largely complete by now — which actually means shrinkage cracks you see today are likely dormant. That’s reassuring. If you see fine vertical cracks in a regular pattern on internal walls, shrinkage is the most probable explanation.

    Lintel deflection

    1970s homes used steel lintels over door and window openings. Over time, some of these lintels have corroded, particularly where cavity trays weren’t properly installed to keep water out. A corroding lintel expands as the rust forms, which can push the masonry apart and create vertical cracks at the sides of openings. If you see cracks running vertically from the corners of window or door frames, lintel condition is worth investigating.

    Subsidence and settlement

    True subsidence — where the ground beneath the foundations is actively moving — is less common than people fear, but it does occur. In Yorkshire, shrinkable clay soils are the main culprit, particularly after prolonged dry summers. Subsidence cracks tend to be wider at the top than the bottom, and they’re often accompanied by sticking doors and windows. Vertical cracks from subsidence are usually more irregular in shape than those from thermal movement.

    Poor construction or historic repairs

    Some 1970s homes were built quickly, and quality control wasn’t always what it should have been. Weak mortar mixes, inadequate foundations, or poorly tied extensions can all produce cracking that becomes apparent decades later. If the house has had extensions or alterations, the junction between old and new work is a particularly vulnerable spot.

    How to Assess the Risk Before You Buy

    If you’re viewing a house and you spot vertical cracks, here’s a practical approach I’d suggest before deciding how worried to be.

    First, photograph everything. Get close-up shots with a coin or ruler for scale, and wider shots showing the crack in context. Note which wall it’s on (internal or external, load-bearing or partition), which direction the crack runs, and whether it’s been previously filled and reopened.

    Second, check the crack width. You can buy a crack width gauge for a few pounds online, or use a credit card (0.76 mm thick) as a rough reference. If a crack is narrower than a credit card, it’s in the minor category.

    Third, look for associated symptoms. Are doors or windows sticking? Are there corresponding cracks on the opposite side of the wall? Is there any sign of damp at the crack? These associated symptoms shift the picture from minor to potentially significant.

    Fourth, ask the vendor. They’re legally required to disclose known structural issues. Ask whether any structural work has been done, whether there are any existing structural reports, and whether the property has ever been the subject of an insurance claim for subsidence or movement.

    Finally, commission a proper structural assessment if anything concerns you. A homebuyer’s survey from a general surveyor will flag cracks but rarely gives you the engineering analysis you need to understand what’s actually happening. A structural engineer will assess the cause, the risk, and the remedial options — giving you the information to make a properly informed decision.

    Repair Options and What They Cost

    I’m not going to give you specific costs here because they vary significantly by location, contractor, and the extent of work needed. What I can tell you is that most vertical cracks in 1970s homes fall into one of three repair categories.

    Cosmetic repairs — raking out and repointing, or filling and redecorating — are appropriate for dormant, minor cracks. These are straightforward jobs for a competent builder or even a confident DIYer.

    Structural repairs may be needed where a lintel has corroded, where a section of masonry has become unstable, or where differential movement has opened a significant crack. These require a structural engineer’s specification before any contractor starts work.

    Underpinning is the most significant intervention, needed when foundations are genuinely inadequate or where subsidence is ongoing. This is relatively rare and is usually only considered after thorough investigation has confirmed it’s necessary. Building Control involvement is required for underpinning work under Building Regulations Part A.

    When to Call a Structural Engineer

    You should get a structural engineer involved if cracks are wider than 5 mm, if they’re clearly live and growing, if they’re accompanied by sticking doors or windows, if they appear at the junction of an extension, if a lintel looks corroded or deflected, or if you simply want professional certainty before committing to a purchase. A structural engineer can tell you not just what the crack looks like, but what caused it, whether it’s likely to progress, and what — if anything — needs to be done about it. That’s the level of analysis that protects your investment.


    Need expert eyes on your project?

    I’m Paul Kangunga, a Chartered Structural Engineer (CEng, MIStructE) based in Huddersfield. The Beam Doctor offers homeowners and builders:

    • Steel beam (RSJ) calculations — Eurocode-compliant, Building Control-ready, in 5 working days. See all services and current fees →
    • Defect investigation — I attend your property, inspect the cracking or movement, and give you a written opinion on the cause. The site visit is included in the price. See the fee bands →
    • Structural Engineer’s Report — a signed desk-based opinion on a single structural concern, for a mortgage lender or an insurance claim. Request a report →
    • On-site attendance — a Chartered Engineer at your property, tiered by duration. See site visit fees →
  • Navigating Building Control: What UK Homeowners Must Know

    Navigating Building Control: What UK Homeowners Must Know

    You’ve just discovered that work carried out on your home — perhaps a wall removal, an extension, or a loft conversion — was never signed off by Building Control. It’s an unsettling position to be in, but you’re far from alone, and there are clear steps you can take to put things right.

    Key Takeaways

    • Building Control approval is a legal requirement under the Building Regulations for most structural and significant building work in England and Wales.
    • Unpermitted work can cause serious problems when you come to sell your home, remortgage, or make an insurance claim.
    • A regularisation application allows you to retrospectively obtain approval for completed work — but it involves inspection and possible remedial work.
    • A structural engineer’s report can support your regularisation application and give your solicitor and buyer confidence in the work.
    • Ignoring the problem is rarely the right answer; the sooner you act, the more options you have.

    What Building Control actually is — and why it exists

    Building Control is the system by which local authorities (and approved private inspectors) check that building work complies with the Building Regulations. In England and Wales, the Building Regulations set minimum standards for structural integrity, fire safety, drainage, insulation, ventilation, and more. Part A of the Regulations specifically covers structure — the bit that matters most when walls are being removed or openings are being formed.

    The purpose of Building Control isn’t to generate paperwork. It exists to make sure that work carried out on homes is safe for the people living in them, and for anyone who buys the property in the future. A Building Control officer will typically inspect the work at key stages — before a beam is covered up, for instance — and issue a completion certificate once everything meets the required standard.

    Without that oversight, there’s no independent confirmation that the work was done correctly. A beam might be undersized. A padstone might be missing. A load-bearing wall might have been removed without adequate support. These aren’t hypothetical risks — I see the consequences of uncontrolled structural work regularly in my practice.

    What counts as notifiable work?

    Not every job around the house requires Building Control approval. Replacing like-for-like windows, painting walls, and fitting a new kitchen (without altering drainage or structure) generally fall outside the scope of the Regulations. However, the following types of work almost always require notification and approval:

    • Removing or altering a load-bearing wall
    • Installing a steel beam (RSJ) or structural lintel
    • Building an extension (including single-storey rear extensions)
    • Converting a loft or garage into habitable space
    • Underpinning foundations
    • Installing a new structural opening for a window or door in a load-bearing wall
    • Most electrical work beyond like-for-like replacement

    If you’re unsure whether the work at your property was notifiable, the safest approach is to contact your local authority’s Building Control department directly. They’re generally helpful and won’t penalise you simply for asking a question. Alternatively, a structural engineer can advise you on whether the specific work falls within scope.

    It’s also worth understanding that Permitted Development rights — which allow certain extensions and alterations without planning permission — are entirely separate from Building Regulations. You can have Permitted Development rights and still need Building Control approval. The two systems operate independently, and conflating them is one of the most common misunderstandings I encounter.

    What happens if Building Control approval is missing?

    The practical consequences of missing Building Control approval tend to surface at two moments: when you try to sell the property, and when something goes wrong.

    At the point of sale

    Your solicitor is required to disclose building work to the buyer’s solicitor. If there’s no completion certificate, the buyer’s solicitor will flag it. This can cause a sale to stall or collapse. Some buyers will walk away. Others will ask you to reduce the price or take out indemnity insurance.

    Indemnity insurance — a word of caution

    Indemnity insurance is often presented as a quick fix. It’s a policy that protects the buyer (and their mortgage lender) against the financial consequences of enforcement action by the local authority. It does not confirm that the work is safe. It does not confirm that the work complies with Building Regulations. It simply provides financial cover if the local authority takes action — which, in practice, they rarely do for older work.

    Mortgage lenders are increasingly reluctant to accept indemnity insurance alone for structural work, particularly wall removals and beam installations. If the work looks significant, they may instruct their own surveyor, who may flag concerns that the insurance doesn’t address.

    If something goes wrong

    If a structure fails — a beam deflects excessively, a wall cracks, a floor sags — and there’s no Building Control sign-off, your insurer may question whether the work was carried out to a proper standard. That can complicate or invalidate a claim. More importantly, people can be hurt. Structural failures don’t always announce themselves in advance.

    The regularisation route: getting retrospective approval

    If the work at your property was carried out after 11 November 1985 and was notifiable but never approved, you can apply for regularisation. This is a formal process through your local authority’s Building Control department that allows completed work to be assessed retrospectively.

    Here’s broadly how the process works:

    • Submit a regularisation application — you’ll pay a fee (set by the local authority) and provide details of the work carried out.
    • Building Control inspects — an officer will visit the property. Depending on what’s been done and how accessible it is, they may ask for parts of the work to be opened up for inspection. This might mean removing a section of plasterboard to inspect a beam bearing, for example.
    • Remedial work if required — if the work doesn’t meet the required standard, you’ll need to put it right before a regularisation certificate can be issued.
    • Certificate issued — once satisfied, Building Control issues a regularisation certificate. This isn’t quite the same as a standard completion certificate, but it’s a formal record and is generally accepted by solicitors and lenders.

    The regularisation process can feel intrusive, but it’s genuinely the most reliable way to resolve the situation. A regularisation certificate gives future buyers and their lenders something concrete to rely on.

    How a structural engineer fits into this process

    A structural engineer can play a valuable supporting role in a regularisation application, particularly where the work involved structural alterations — wall removals, beam installations, new openings, and so on.

    When I’m asked to help in these situations, I typically carry out a site inspection to assess the existing structure. I’ll check the beam size against the span and loading, confirm whether padstones are present and adequate, and look at how the load is being transferred down through the building. I then produce a structural report setting out my findings.

    This report serves several purposes. It gives the Building Control officer independent professional evidence about the adequacy of the structure. It gives the homeowner clarity about whether the work is actually safe. And it gives solicitors, buyers, and mortgage lenders a document they can rely on — something more substantive than an indemnity policy.

    In some cases, I find that the work is structurally adequate despite the lack of formal approval. In others, I identify deficiencies that need addressing. Either way, knowing the true position is far better than hoping for the best.

    It’s also worth noting that Approved Document A, which supports Part A of the Building Regulations, provides guidance on structural requirements. A structural engineer working to current standards will reference this guidance as part of their assessment.

    What if the work is older than 1985?

    Regularisation only applies to work carried out after 11 November 1985. For older work, the regularisation route isn’t available. However, the structural concerns are just as real, and a structural engineer’s report can still provide evidence of the current condition of the structure.

    For sale purposes, older unauthorised work is generally handled through indemnity insurance, since the local authority’s enforcement powers are time-limited. But I’d always recommend getting a structural engineer to assess the work independently, regardless of the insurance position. A policy that pays out if the council takes action doesn’t tell you whether the beam over your kitchen is the right size.

    When to call a structural engineer

    You should involve a structural engineer as soon as you identify that structural work at your property lacks Building Control approval — particularly if that work involved removing walls, installing beams or lintels, or altering foundations. A structural engineer can assess whether the existing work is safe, produce a report to support a regularisation application, and give you an honest professional view of your position before you commit to a course of action. If you’re in the process of buying a property and a surveyor has flagged missing Building Control approval for structural work, that’s equally a situation where independent structural input is worth having before you exchange.


    Need expert eyes on your project?

    I’m Paul Kangunga, a Chartered Structural Engineer (CEng, MIStructE) based in Huddersfield. The Beam Doctor offers homeowners and builders:

    • Steel beam (RSJ) calculations — Eurocode-compliant, Building Control-ready, in 5 working days. See all services and current fees →
    • Defect investigation — I attend your property, inspect the cracking or movement, and give you a written opinion on the cause. The site visit is included in the price. See the fee bands →
    • Structural Engineer’s Report — a signed desk-based opinion on a single structural concern, for a mortgage lender or an insurance claim. Request a report →
    • On-site attendance — a Chartered Engineer at your property, tiered by duration. See site visit fees →
  • What to Do If You Find a Crack After Moving In

    What to Do If You Find a Crack After Moving In

    You’ve just moved into your new home, boxes still unpacked, and then you spot it — a crack running across the wall or ceiling that you’re almost certain wasn’t there when you viewed the property. It’s unsettling, and you’re right to take it seriously, but the good news is that not every crack signals a structural emergency.

    Key Takeaways

    • Most cracks in newly occupied homes are caused by minor settlement or thermal movement, not structural failure.
    • The size, shape, location, and pattern of a crack are the key factors in assessing its severity.
    • Cracks wider than 5 mm, or those appearing near structural openings, warrant professional investigation.
    • A structural survey carried out before purchase may have missed active movement — discovering a crack after moving in doesn’t necessarily mean the surveyor was negligent.
    • Building Regulations Part A governs structural stability in England and Wales; any remedial work affecting structure must comply.

    Why Cracks Appear After You Move In

    Moving into a property changes it in ways that are easy to underestimate. Central heating that was previously left on a low setting gets cranked up. Rooms that were empty are now full of furniture, books, and people. A house that sat quietly vacant for months suddenly has a completely different thermal and loading profile. All of this causes materials to expand, contract, and shift slightly — and cracks are often the visible result.

    The most common culprits are entirely benign. Plaster shrinks as it dries out after a period of high humidity. Timber joists and studwork lose moisture when heating is increased, causing hairline cracks at junctions between different materials. New plasterboard partitions frequently crack at the taped joints during their first heating season. These are cosmetic issues, not structural ones, and a decorator with a tube of flexible filler can sort them out.

    That said, some cracks do indicate something more serious. Subsidence, foundation movement, overloaded lintels, and failed structural elements can all produce cracking that demands proper investigation. The difficulty for a homeowner is knowing which category a particular crack falls into — and that’s exactly what this article is here to help you understand.

    How to Read a Crack: Size, Shape, and Location

    Before you panic or dismiss a crack entirely, take a few minutes to examine it carefully. These three characteristics tell you most of what you need to know at first glance.

    Width

    The Building Research Establishment’s classification system — widely used by structural engineers in the UK — categorises cracks from Category 0 (hairline, less than 0.1 mm) through to Category 5 (very severe, over 25 mm). As a rough guide, if you can’t fit a 10p coin into the crack, it’s unlikely to be immediately dangerous. Cracks wider than 5 mm should always be investigated by a professional.

    Shape and Direction

    Diagonal cracks running at roughly 45 degrees from the corners of window and door openings are a classic sign of differential settlement — where one part of the foundation has moved relative to another. Horizontal cracks in brick or blockwork can indicate lateral pressure on a wall, which is a more serious concern. Vertical cracks running straight up through mortar joints are often caused by thermal expansion and are generally less worrying, particularly if they appear at regular intervals.

    Location

    Cracks near structural openings — above doors, windows, or where a wall has been removed and an RSJ or lintel installed — deserve extra attention. These areas carry concentrated loads, and a failing lintel or inadequately sized beam will often announce itself through cracking in the surrounding masonry or plasterwork. Similarly, cracks that run from floor to ceiling in a straight line can suggest movement in a structural wall.

    Cracks That Need Immediate Attention

    Some crack patterns are urgent. If you notice any of the following, stop reading and call a structural engineer today rather than waiting to see how things develop.

    • Cracks wider than 5 mm that have appeared suddenly, or that you can see are actively widening.
    • Cracks accompanied by doors or windows that have jammed, stuck, or started binding in their frames — this suggests the opening is being distorted by movement.
    • Diagonal cracking at 45 degrees from multiple window and door corners simultaneously, particularly if it’s progressing upwards through the structure.
    • Any crack accompanied by a visible lean or bulge in an external wall.
    • Cracks in the ceiling directly below a bathroom, which could indicate a failed joist or water damage to structural timbers.
    • Horizontal cracking in a retaining wall or basement wall, which can signal dangerous lateral earth pressure.

    These scenarios can escalate quickly. Under Approved Document A of the Building Regulations, structural elements must be capable of safely carrying the loads imposed on them — if there’s any doubt about whether that condition is being met, professional assessment is not optional, it’s essential.

    What Your Pre-Purchase Survey May Have Missed

    One of the most frustrating situations I encounter is a homeowner who paid for a survey before purchase and is now wondering why the surveyor didn’t flag the crack they’ve just found. There are a few important points to understand here.

    A standard RICS HomeBuyer Report is a visual inspection carried out at a single point in time. The surveyor can only report on what is visible and accessible on the day they visit. If a crack was hidden behind furniture, covered by freshly applied filler and paint, or simply hadn’t appeared yet, it won’t be in the report. This isn’t necessarily negligence — it’s a limitation of the service.

    A full RICS Building Survey (Level 3) goes further and is more appropriate for older properties, those with visible defects, or homes that have been significantly altered. If you bought a Victorian terrace with a recently knocked-through ground floor and only commissioned a Level 2 report, the scope of that survey may not have been adequate for the property’s condition.

    If you genuinely believe the surveyor missed something that was clearly visible and should have been reported, you can raise a complaint through the RICS. But in many cases, the crack that appears after moving in is new movement triggered by the change in occupancy — not something that existed before completion.

    Monitoring Cracks Yourself Before Calling Anyone

    If a crack doesn’t fall into the urgent category above, a period of monitoring is a perfectly reasonable first step. This gives you useful evidence to share with a structural engineer and helps distinguish between active movement and an old, stable crack.

    The simplest method is to mark the ends of the crack with a pencil and note the date. Check it weekly for a month. If the crack extends beyond your pencil marks, it’s active. If it stays within them, it’s likely historic and stable.

    A more precise approach is to use a tell-tale — a small plastic gauge that bridges the crack and allows you to measure any change in width or displacement. These cost a few pounds from a builders’ merchant and are worth using if you want a clear record to show a professional.

    Photograph the crack in good light, ideally with a ruler or coin in frame for scale. Note whether it changes appearance after heavy rain, during cold weather, or after the heating has been running for several hours. These patterns can help a structural engineer identify the underlying cause much more quickly.

    What a Structural Engineer Will Do

    When I carry out a structural inspection for a homeowner who’s found a crack after moving in, my process is methodical. I look at the full context of the building — its age, construction type, any alterations that have been made, and the ground conditions where possible. I examine the crack itself, but I also look at the wider pattern of any cracking throughout the property, because individual cracks rarely tell the whole story.

    I’ll check whether any walls have been removed and whether the beam or lintel above the opening is appropriate for the load it’s carrying. I’ll look at padstones — the bearing plates that transfer load from a beam into the wall below — to check they’re correctly sized and positioned. I’ll examine the condition of any visible structural timbers, and I’ll look at the external walls for signs of bowing, leaning, or stepped cracking in the mortar joints.

    After the inspection, I produce a written report that clearly states what I’ve found, what I believe the cause to be, and what action — if any — I recommend. That might be “monitor and review in six months,” or it might be “commission a drainage survey immediately and prop this wall while we investigate.” The report gives you something concrete to act on, and something to show your mortgage lender, insurer, or solicitor if needed.

    When to Call a Structural Engineer

    If a crack is wider than 5 mm, is actively growing, is accompanied by sticking doors or windows, or sits near a structural opening such as a removed wall or chimney breast, you should call a structural engineer rather than a builder or general surveyor. The same applies if you’re planning any remedial work that involves the structure — under Building Regulations Part A, structural alterations require proper design and, in most cases, Building Control sign-off. A chartered structural engineer can assess the risk, specify the correct repair, and give you the professional assurance that the work has been done correctly.


    Need expert eyes on your project?

    I’m Paul Kangunga, a Chartered Structural Engineer (CEng, MIStructE) based in Huddersfield. The Beam Doctor offers homeowners and builders:

    • Steel beam (RSJ) calculations — Eurocode-compliant, Building Control-ready, in 5 working days. See all services and current fees →
    • Defect investigation — I attend your property, inspect the cracking or movement, and give you a written opinion on the cause. The site visit is included in the price. See the fee bands →
    • Structural Engineer’s Report — a signed desk-based opinion on a single structural concern, for a mortgage lender or an insurance claim. Request a report →
    • On-site attendance — a Chartered Engineer at your property, tiered by duration. See site visit fees →